Yoga Poses You Probably Do Wrong Every Time
The benefits of yoga are numerous. If you currently practice yoga, you've probably noticed your muscles becoming stronger and your flexibility increasing. But whether you're a bona fide yogi or a yoga newbie, you might be making mistakes that are actually hard on your body — ones that might even be dangerous.
Many instructors will tell you there is no one right way to do a pose, and you can grow your practice by experimenting and learning what modifications work for you. But there are wrong ways to do a pose; even the most experienced practitioners are smart to review their foundation and check their posture every time. "I always assure people that they are the world's leading expert in their own body," Ann Swanson, yoga therapist and author of the international best-selling book, Science of Yoga, told Health Digest. "However, there are safety precautions they need to consider to avoid injury."
So let humility lead the way to a stronger practice by taking a look at the following yoga poses, what people often get wrong when doing them, and how you can improve your posture the next time you hit the mat.
The Easy Pose (Sukhasana)
Many yoga routines start with Sukhasana, or the Easy Pose, as a way to bring intention and stillness to the moment, and help you transition from whatever was going on prior to the time on the mat. It's a grounding pose also held in meditation, helping to bring mindfulness as you begin a period of reflection. But the name itself is a misnomer.
"Sukhasana is not always that easy," Adriene Mishler, an international yoga teacher with an online community of over 8 million subscribers, revealed in a YouTube tutorial. "I like to think of it as this pose of ease ... where we attempt to find ease," she continued.
So, where do people go wrong with the not-so-easy Easy Pose? Yoga instructor Donna Jackson told Women's Health that many people tuck their pelvis under and round their backs. Instead, Adriene recommends in her video that you "think about finding a straight line from the crown of the head through the heart and then to the pelvis." If you need to bolster yourself up a bit to help get your heart over your pelvis, tuck a blanket or a pillow under your body.
Downward-Facing Dog (Adho Mukha Svanasana)
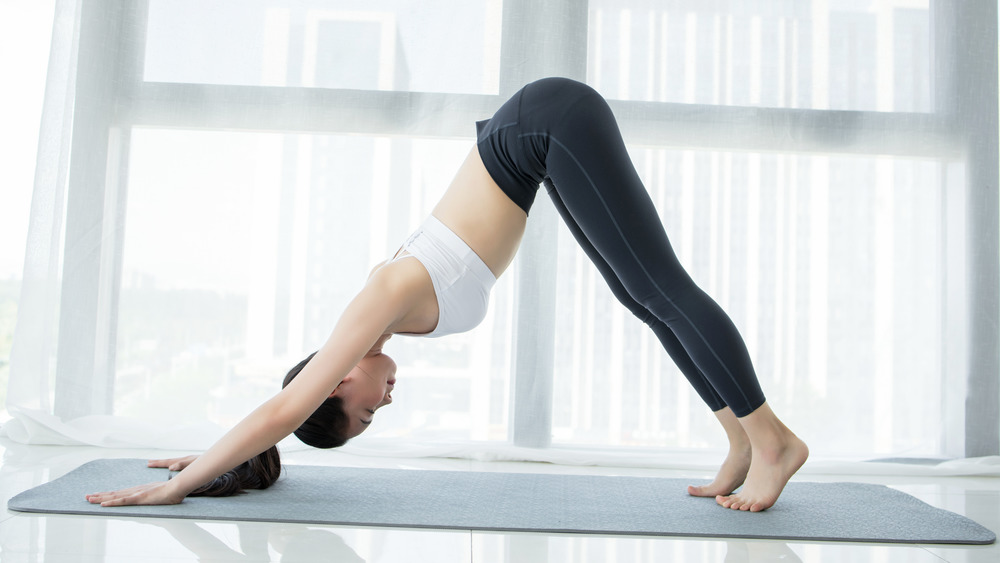
You'd be hard-pressed to find a yoga practice that doesn't include the quintessential Downward-Facing Dog, at least here in the United States. That's because the benefits are undeniable; it builds bone density and upper body strength, eliminates stiffness and back pain, and boosts circulation and energy (via Self). However, mistakes abound in the pose also known as Adho Mukha Svanasana.
First, there's no need to straighten your legs to the point that your knees lock. Yoga therapist Ann Swanson explained to Health Digest, saying people bend their knees if they are tight in this pose or, if they are hypermobile, they don't go as deep into it.
As Stacy Dockins, a yoga teacher and corrective exercise expert, pointed out to Well+Good, "Any time a joint locks out, it allows the body to have a rest-stop, avoiding the essential surrounding muscular activation. With locked knees, pelvic mobility is lacking." Done correctly, you can create length, strength and space in your entire body with this pose (via Yoga Journal).
Upward-Facing Dog (Urdhva Mukha Svanasana)
To be fair to Downward-Facing Dog, Upward-Facing Dog presents challenges to yogis as well. Both poses are, in fact, part of a vinyasa flow quite common in American practices. Sometimes a teacher will include the similar Cobra in their flow — but with an Upward-Facing Dog, you lift your pelvis and legs up off the floor, activating your entire body.
While you might move through the pose quite quickly, it's worth recognizing that, if you're not careful, you could get it wrong. According to Yoga Journal, you might round your shoulders forward and collapse your chest (your chest should be open) or you might keep your legs and tops of the feet resting on the mat (you should press up and off).
Instead, a yoga instructor demonstrated in video for NBC News how you should work to lengthen your arms, lifting up your thighs and knees, extending your neck while dropping your shoulders, and looking straight ahead. And be careful not to toss your head up to the ceiling, creating tension in the back of the neck.
Cat-Cow (Chakravakasana)
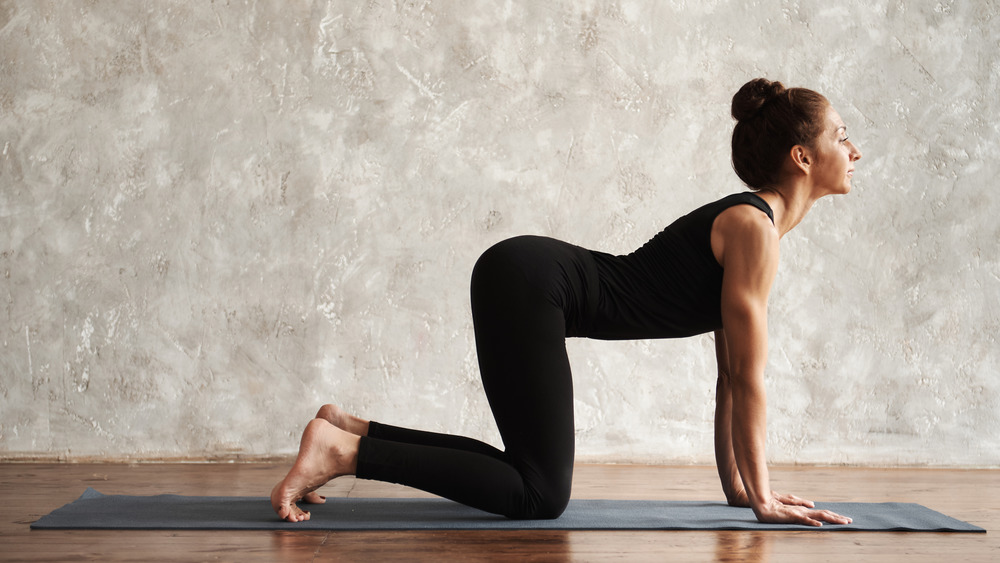
The Cat-Cow pose is actually two poses (Cat and Cow, as you may have guessed) morphed into one posture as they are typically practiced in sequential flow. Together, they work to stretch out the spine. When added to the beginning of a yoga practice, they serve as a gentle warmup.
The main focus during Cat-Cow is on your breathing — inhaling in one pose (Cow) and exhaling as you round into the other (Cat). However, you can hurt either your lower or middle back if you don't do this pose properly or if you move too quickly.
So slow down your Cat-Cow flow. Keep length in your neck to avoid unnecessary strain. And keep the movement in the spine — not your arms or your elbows (via Verywell Fit). As Las Vegas-based yoga teacher and massage therapist Jules Mitchell demonstrates in a HuffPost instructional, a slow articulation of the spine is key to preventing undesirable back pain.
Plank Pose (Phalakasana)
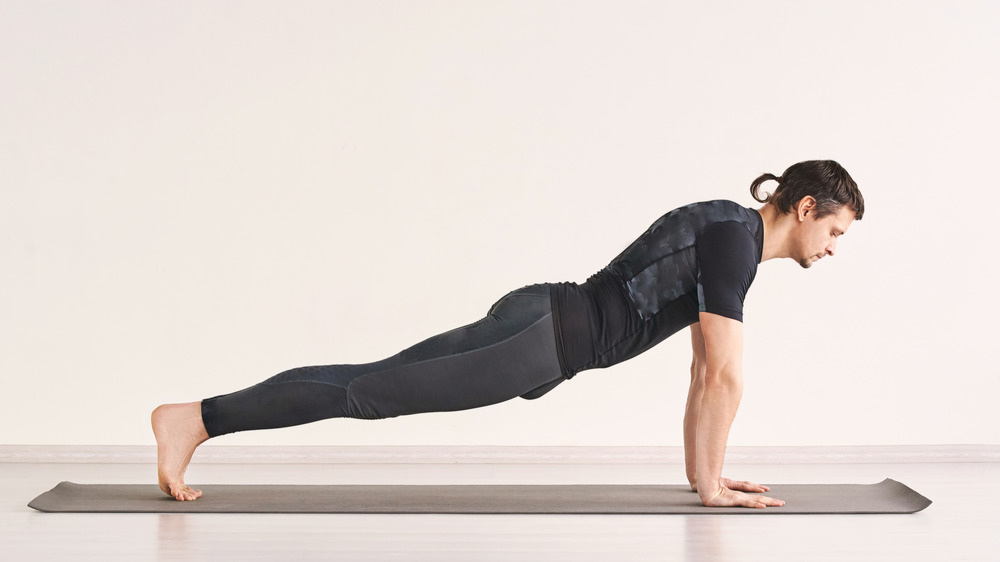
Admit it, your arms hurt just looking at the Plank Pose, right? However, when properly done, Plank Pose is an amazing yoga pose. "Plank Pose is a posture you will encounter in almost every yoga class, yet students often do it incorrectly," Stephanie Morgyn, a yoga instructor and mindfulness coach from Chicago told Health Digest. "If you do not align your bones and stack your joints correctly, it can lead to wrist, neck, and lower back strain."
With a proper Plank Pose, you want to create a single line of energy from the crown of your head out through your heels. Feet should be hip distance apart, heels should stack over your toes. Lift the back of your hamstrings up to the sky and squeeze your glutes to protect your low back from sinking and potentially causing injury. Create a soft bend into your elbows as not to lock out your joints. Gaze down to the mat to elongate your spine and protect your neck from potential strain.
When done correctly, a proper Plank, taken in its traditional form (High Plank) or with arm support coming from the forearms (Dolphin Plank), is a total-body strengthener (via Self).
Four-Limbed Staff Pose (Chaturanga Dandasana)
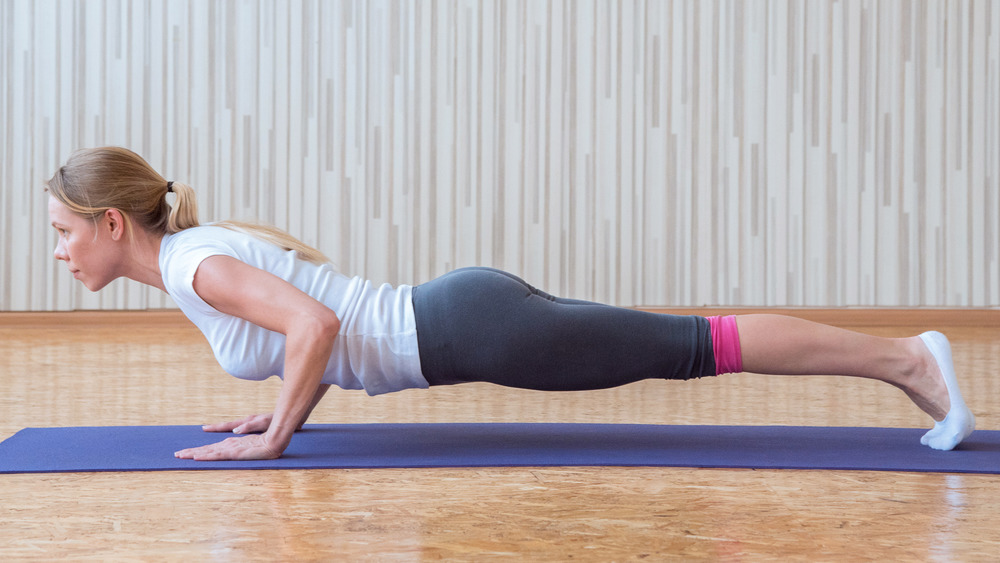
A good Chaturanga, or Four-Limbed Staff Pose, can make your vinyasa flow smoothly, but if you lack the arm and shoulder strength to pull it off comfortably and safely, it can be your practice's nemesis. The truth is, Chaturanga is basically a pushup for your entire body. A tricep pushup, too — and we all know our triceps are hard to work and often remain weaker than their counterpart, the bicep. But you don't want to practice it like a pushup, as that's where you'll run into problems.
"Yoga students often have a tendency to either dip in the shoulders or drop in the hips due to weaker back and core muscles while practicing Chaturanga," Holly Skodis, registered yoga teacher and founder and host of the Yoga is Vegan podcast, told Health Digest.
So what's the fix? Start with a modification until you build up strength. Do this pose on your knees or use a strap to "catch yourself" so you don't drop too quickly. Either way, engage your entire body (largely your core and your quadriceps) until you are able to flow in and out of this pose properly.
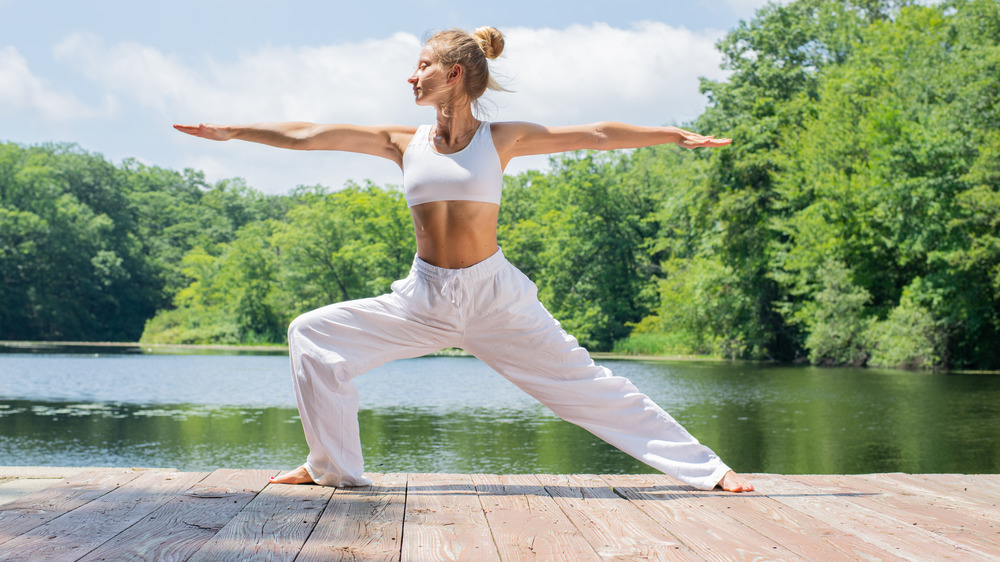
Warrior I (Virabhadrasana I)

The family of warrior poses invites us to embody the spirit of a warrior, standing fierce and strong on a battlefield. Warrior I, or Virabhadrasana I, is a standing power pose that mentally reinforces focus and physically brings stability and balance.
With Warrior I, you take a wide lunge forward and anchor the back foot flat. The heel of the front foot should line up with the arch or heel of the back foot. Placing the back foot at a diagonal helps you root down through the outer edge of the foot and find lift through the inner arch.
"We often see the common misalignment of lifting the back heel off the mat," yogi Bobby Rodriquez of Yoga Pose, a free digital library of yoga poses, told Health Digest. If your back heel is coming up, try to shorten your stance or widen the angle of your back foot while keeping a diagonal. Additionally, aim to drop your lunging knee right over your toes, without letting it buckle left or right. And don't avoid the depth of the lunge. Once the hamstring and groin find space, allow the weight of your pelvis to fall forward into the front foot. "Trust your legs!" added Rodriquez.
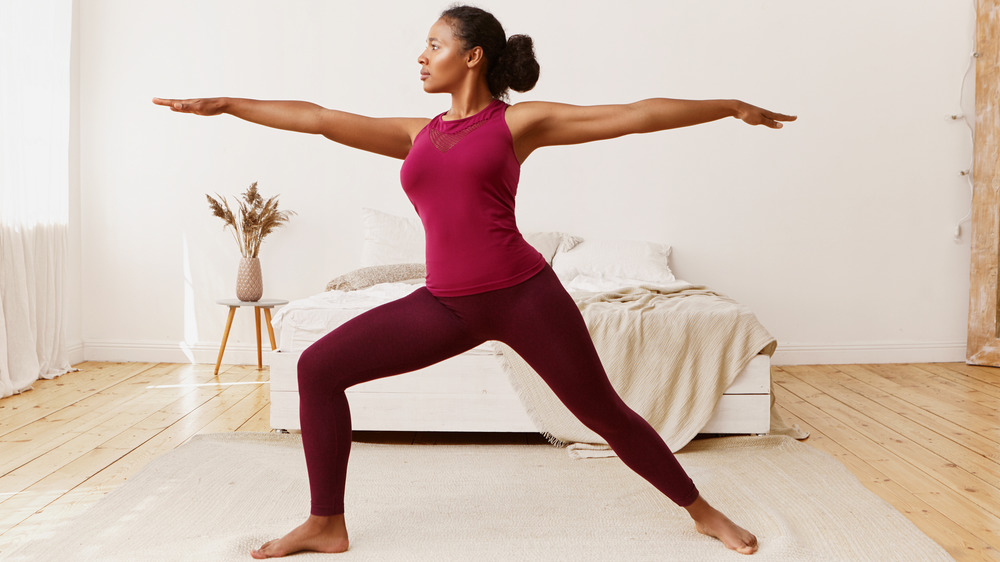
Warrior II (Virabhadra II)
The famous Warrior II (Virabhadra II) posture engages the entire body, but people err with the placement of the front knee, the stance of the back leg, and the positioning of the arms, shoulders and core.
"I see students swaying their front knee in this pose which applies a lot of pressure," Huma Gruaz, a certified yoga teacher and yoga therapist based out of California, told Health Digest. It is important to stack the front knee on top of the ankle of the front leg, reducing joint pressure. It is also important to turn the torso towards the side of the mat only within a range of motion that allows the front knee to stay comfortably stacked on top of the front ankle. "Sometimes students strive to turn their chest parallel to the side of the mat in this pose at the expense of their front knee," explained Gruaz.
Additionally, arms should form a straight line to create balance, give length and extend the activated arm muscles (deltoids, biceps, triceps) while expanding the upper back muscles (rhomboids). Shoulders should roll away from the ears to avoid neck and upper back soreness; abdominal muscles should stay lifted to protect the lower back.
Reverse Warrior (Viparita Virabhadrasana)
In many vinyasa flow classes, Reverse Warrior, aka Viparita Virabhadrasana, is often moved through quickly as a transitional, moving pose. But it can be overlooked and done improperly, cheating yourself of the key benefits. Like the other Warrior poses, Reverse Warrior strengthens and stretches the entire body, but it also opens the chest and lengthens the side body. Doing this pose incorrectly, however, can be problematic.
"A common misalignment we see in Reverse Warrior is allowing the front leg to straighten while reaching back," yogi Bobby Rodriquez of Yoga Pose revealed to Health Digest. Instead, work to drop the front knee toward the toes as the arm reaches in the opposite direction. "Trust your legs and feet to anchor you as you drop the pelvis," he continued.
People also often try to find a backbend in the Reverse Warrior pose. Instead, you should consider twisting from the waist to square the chest sideways before reaching the arm up. Remember, this pose is more about stretching the side of the waist and opening up.
Extended Side Angle Pose (Utthita Parsvakonasana)
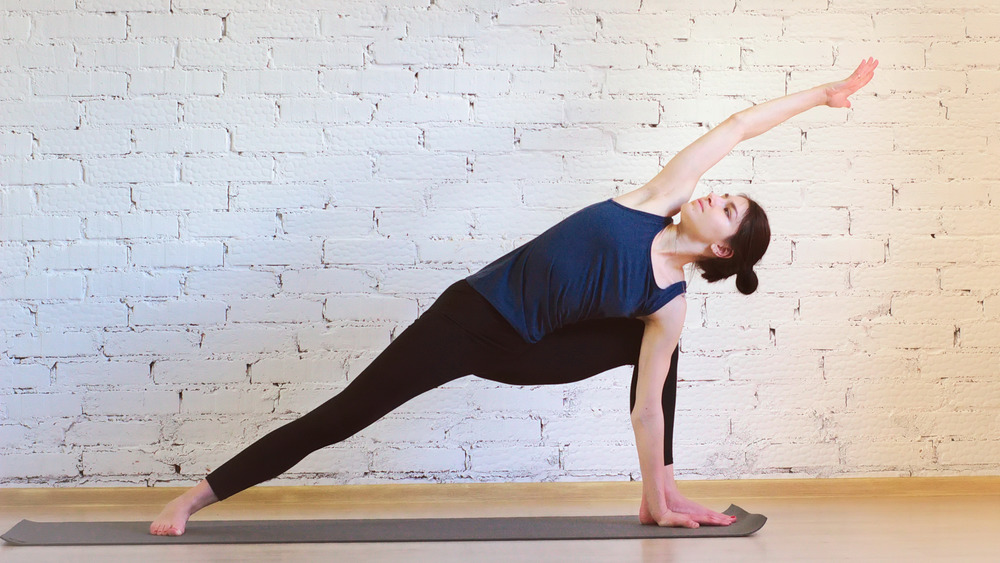
If the side stretch in Reverse Warrior doesn't give you what you want or need, you may seek the lengthening Utthita Parsvakonasana, or Extended Side Angle Pose. It builds strength in the legs and stretches the groin and inner thighs. Doing this pose incorrectly, however, means you'll lose the benefit of the posture.
It is important not to take the front knee past the ankle, just like in Warrior I or II poses. Stack the knee above the ankle to avoid unnecessary pressure on the knees. Keep the knee from turning inwards, another source of strain that can be avoided. Bend less, if need be, to make the pose more comfortable while you make these adjustments.
It's human nature to think about using your arm to support your weight in a pose like this, especially if we are leaning on the bent leg or a block as a modification. However, that negates the leg strengthening benefits of this pose. So keep lifting your torso, don't let your arm bear the weight. Be mindful about working your legs instead.
Side Plank (Vasisthasana)
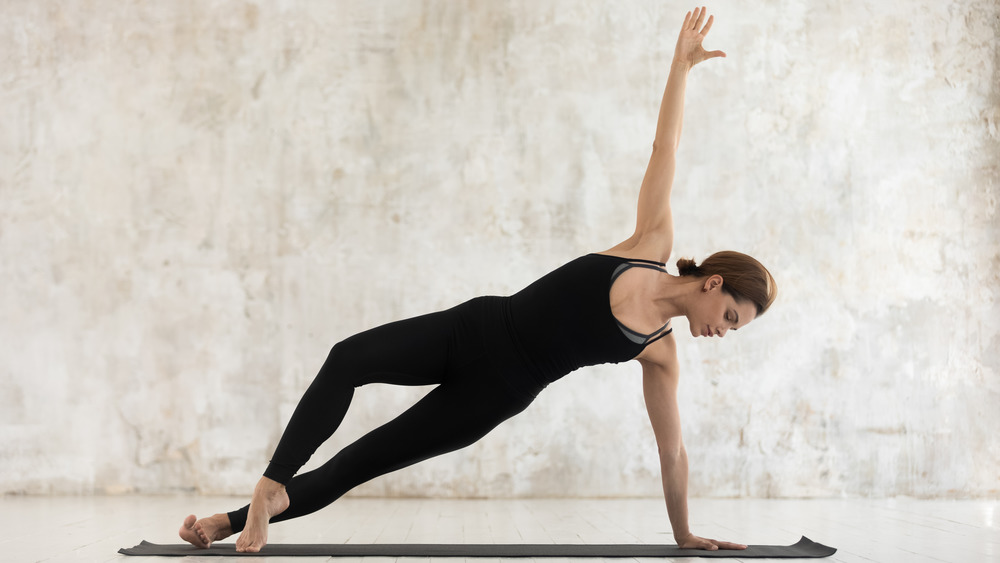
If you've built up enough strength to hold the Plank Pose, you might think about taking the pose to the next level by attempting a Side Plank (Vasisthasana). While it is an amazing posture to build core strength while also strengthening the shoulders, arms, wrists, and legs (this pose delivers a full body experience), Side Planks are often done incorrectly, according to yoga studio owner, international instructor, and YogaByCandace founder, Candace Moore.
People tend to drop the hips toward their mat, collapse into their wrists, drop their heads (instead of keeping them in line with their spines), and disengage the upper arm, which should be energetically in line with the other arm.
With this pose, you must use your obliques to lift your body up. If you do not have this strength now (it takes time to develop), it's better to modify the pose by practicing on the forearm, dropping the lower knee to the ground, or placing the top foot on the ground in front of you while continuing to extend the bottom leg (via Gaia).
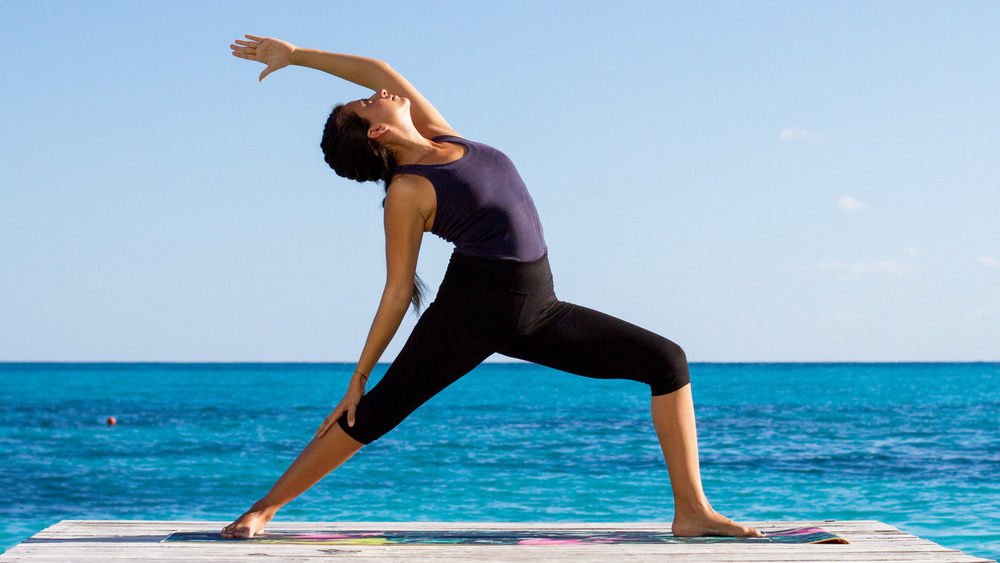
Triangle Pose (Trikonasana)
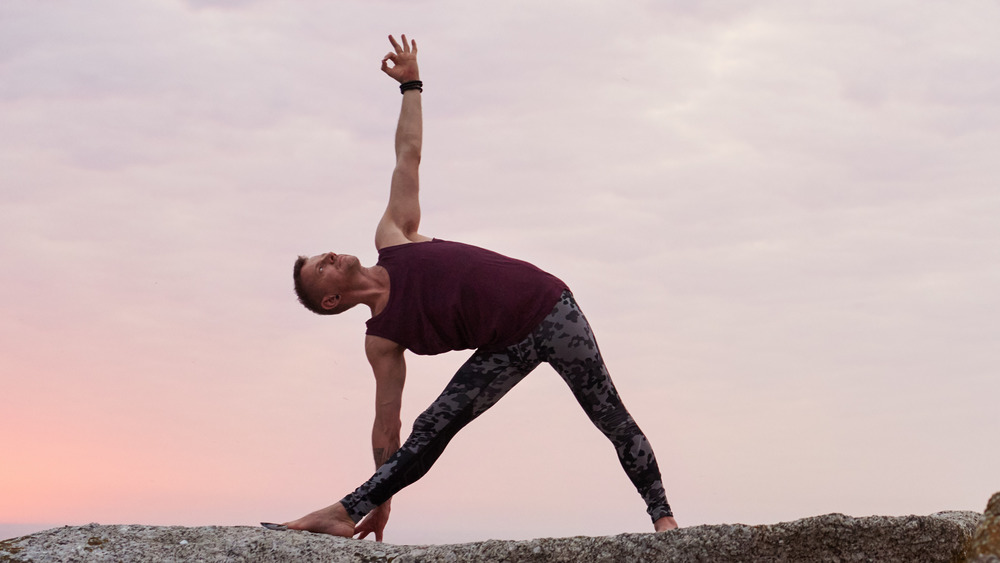
Triangle Pose, or Trikonasana, challenges people's flexibility. Done correctly, it is a great leg strengthener and hip and chest opener. It's also a pose that engages yogis' brains as they work on both balance and stability.
Unfortunately, people often collapse down, incorrectly thinking the goal is to reach the ground and get into the final posture. "Triangle is not only about going down, Triangle is about going out," California-based yoga instructor Rudy Mettia in a HuffPost video tutorial. He explained that it should be "an extension" of the spine, but you shouldn't round your back to get through the pose.
Instead, focus on the movement. Anchor your back heel down. Engage the leg muscles. Open the chest. Hinge at the hip and lengthen both sides. There is no shame in using a block for this pose. Consider it a journey, your journey, and remember it's not really about the destination. When you do arrive in the pose, though, reach your top arm up to the ceiling. You can look up, but if your neck bothers you, look down. You're already there, remember?
Standing Forward Bend (Uttanasana)
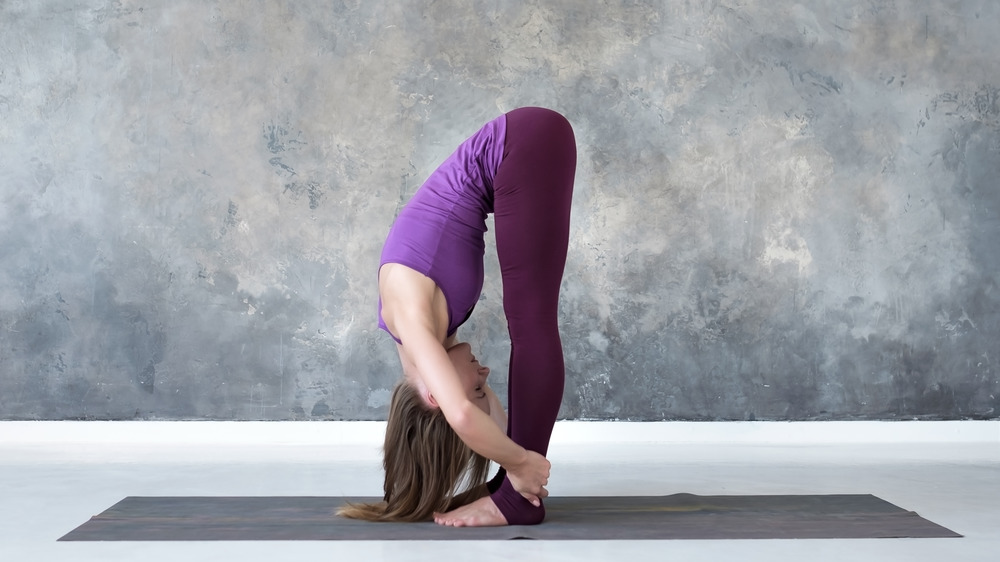
For many people, Uttanasana, or what's known as the Standing Forward Bend, is a pose that brings relief and comfort to the middle of a practice. But it's also one both beginners and seasoned practitioners struggle with.
"Often, we see folks locking their knees and bending from the center of their spine instead of from the hips," Kristin Schultz, yoga instructor and founder of Zia Yoga & Wellness, a full-service yoga studio in Pennsylvania, told Health Digest. "This causes a sense of over-stretching and tightness in your hamstrings and may cause stress in your lower back and along your neck."
This straightforward, deeply grounding, and introspective pose opens the back lines of the body through deep hip flexion. The key is to find a deep bend in your knee as you fold forward. Sure, you can release your arms, shoulders, neck and head. But keep drawing your shins forward, staying connected to the ground through your feet. "As your body warms up and progresses over time," explained Schultz, "you can begin to slowly extend the knees, but be sure to keep your torso close to your thighs."
Corpse Pose (Savasana)
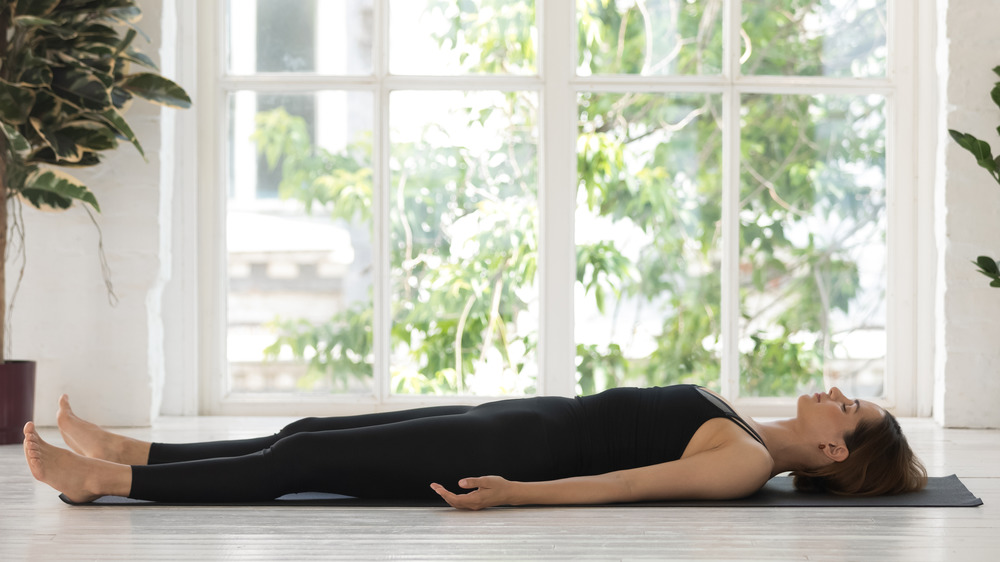
There are many reasons not to skip the Corpse Pose (aka Savasana), according to Self. Sure, it's a restorative posture after your practice. But the hard work is in quieting your mind and settling in for inactivity and non-movement, something we all resist. One way you can perform this pose incorrectly is by not doing it — skipping out of an in-person class or jumping up and turning off the video at home. To maximize the benefit of your yoga practice, give in to the stillness of Savasana.
It is mentally difficult to intentionally relax. You must engage your mind, not your body. Actively release your muscles, every one of them. If you struggle, elevate your calves with a bolster or a pillow. Support your back and neck if lying flat on the floor brings discomfort or tension.
In Savasana, and all the poses you move through in your yoga practice, it is important to remember that your body is uniquely yours. "I always recommend my students to feel the pose from inside out rather than being attached to an ideal form of the pose as yoga is a non-competitive practice that teaches us to become more intimate with our own bodies," Huma Gruaz, certified yoga teacher and yoga therapist, told Health Digest.