Low Calorie Cheesecake
Cheesecake is a classic comfort food for good reason. Rich and decadent, it's definitely a special occasion treat. Or at least, it was — until recipe developer Michelle Morey of Barefoot in the Pines got her hands on it!
"Cheesecake is my absolute favorite dessert to make, and I realize how indulgent it can be," she says. "I was really excited to make a low-calorie version to see if it was possible to enjoy one of the most delicious desserts ever, guilt-free!"
This cheesecake is made with a combo of low-fat Neufchatel cheese, cottage cheese, and Greek yogurt. Brightened up with a bit of lemon, it's a far lighter version of the rich classic. "The flavor of the cheesecake is much [brighter] and [more] refreshing," Morey notes. "The flavors really come through more without being muted by all the fat from traditional cheesecake ingredients ... this also allows us to get away with less sugar!"
You could also experiment with other flavors, she says. "Orange zest or lime zest would be divine. Or plain vanilla, with maybe a teaspoon of vanilla bean added, would be great, too."
Gather the ingredients to prepare this low-calorie cheesecake
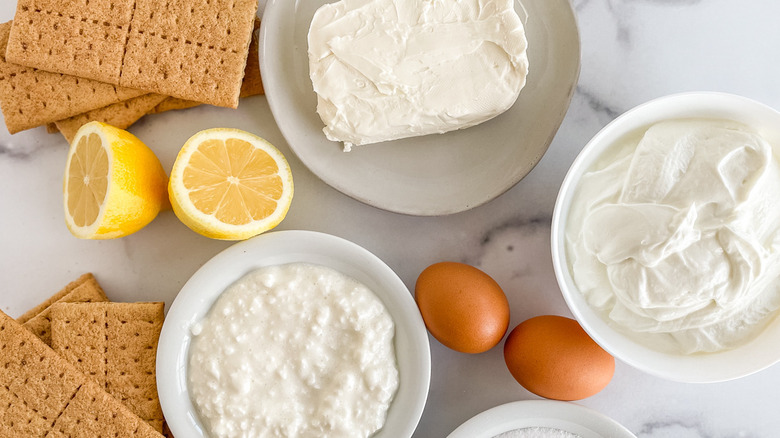
To make this low-calorie cheesecake, you'll begin with a combination of low-fat Neufchatel cream cheese, low-fat cottage cheese, and low-fat Greek yogurt. The mixture will form a creamy base for the cheesecake. Eggs add structure, while sugar adds that necessary touch of sweetness. Vanilla, lemon juice, and lemon zest round out the filling nicely.
For the base, low-fat graham crackers are sweetened with a touch of brown sugar. (You can opt for cinnamon graham crackers for even more flavor.) A touch of butter and a bit of water helps the crust adhere. A pinch of salt, and you have everything you need to make your low-cal cheesecake dreams come true.
Prepare the mold and the cottage cheese
To make this low-calorie cheesecake, first prep the pan. Morey opts for an 8-inch round cake pan with high sides, rather than the springform pan called for in so many cheesecake recipes.
"In my experience, every cheesecake I've made in a springform pan has had a soggy crust, because the water bath seeped in through the removable bottom. Even when wrapped in foil," she says. "If this cake is made in a springform pan, the water bath would need to be eliminated or placed on the rack below the cake. This might change the cooking time and cause cracking."
Instead, spray your cake pan with cooking spray, and line the bottom with a circle of parchment paper. Spray that with cooking spray, too. (You can never be too careful!)
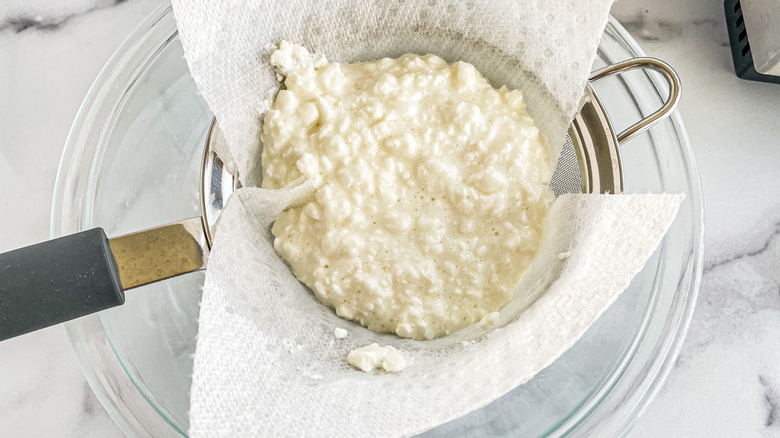
Meanwhile, strain out the extra liquid from the cottage cheese: Line a mesh strainer with a paper towel, and place it over a bowl before adding the cottage cheese. According to Morey, this step "helps the cheesecake set up better and make the batter less liquid-y." Drain it for 30 minutes, which should be just long enough to make the crust.
Make the crust for the cheesecake
Preheat the oven to 350 F. It's time to get down to business.
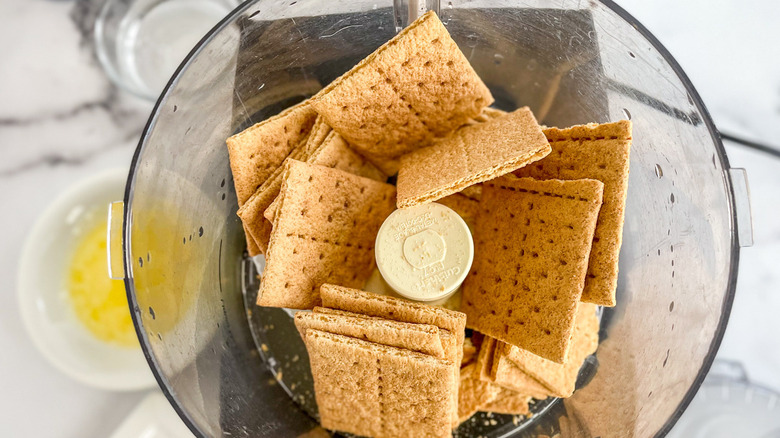
Break the graham crackers into the bowl of a food processor, and process into coarse crumbs. Add the brown sugar, salt, and butter, and pulse until combined.
Next, drizzle in the water, and pulse once more, until the mixture begins to clump. It shouldn't be soggy or wet, but it should have the texture of damp sand. When you squeeze it in your hand, it should clump together and hold. When it reaches this stage, you're ready for the next step: baking.
Bake the graham cracker crust

Transfer the graham cracker mixture into the prepared cake pan, and press the crumbs down well, until an even and compact layer forms. Bake for 10 to 12 minutes, until lightly golden brown around the edge. (This is the perfect time to clean the food processor. You'll need it later to make the filling!)
This par-baking step might seem like overkill when the cheesecake is going to be spending over an hour in the oven later, but trust us — it's the best way to make sure the crust keeps from becoming soggy.
When the crust is baked, set it aside to cool, but don't turn the oven off yet.
Make the cheesecake filling
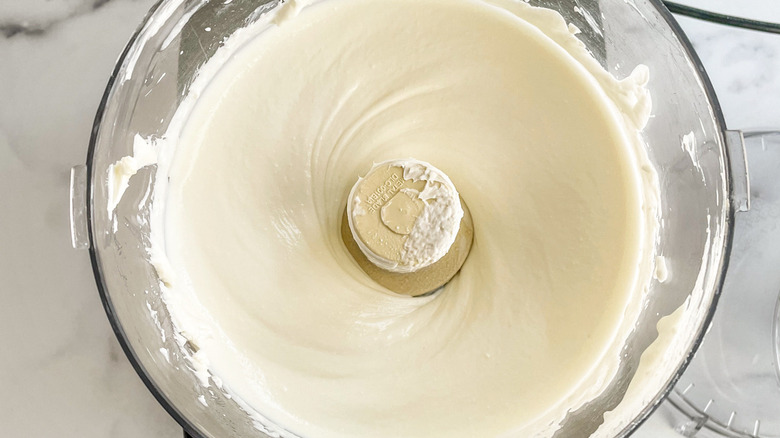
Now that the cottage cheese has drained, transfer the curds to the food processor, and process until smooth. Add the Neufchatel and Greek yogurt, and process once more until smooth and combined.
Scrape down the sides of the food processor before adding the sugar, vanilla, lemon juice, and lemon zest. Blend until fully combined, then season to taste with more vanilla or zest. Process once more, then add the eggs one at a time, mixing after each addition.
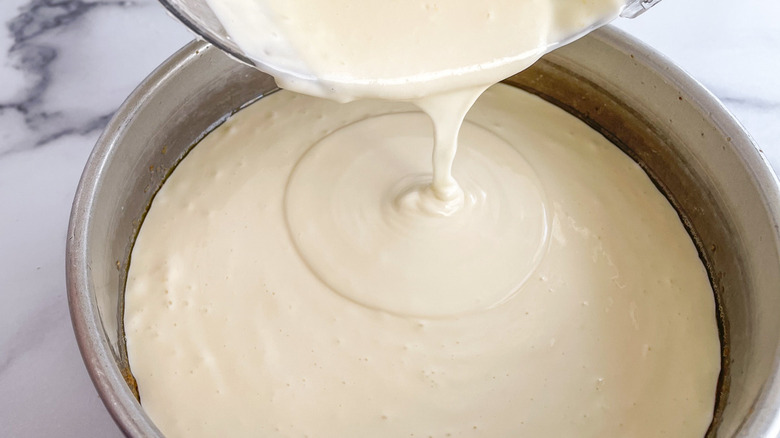
Once the batter is fully mixed, spray the inside of the cake pan one more time — being careful not to disturb the crust — and add the batter to the pan.
Bake the cheesecake
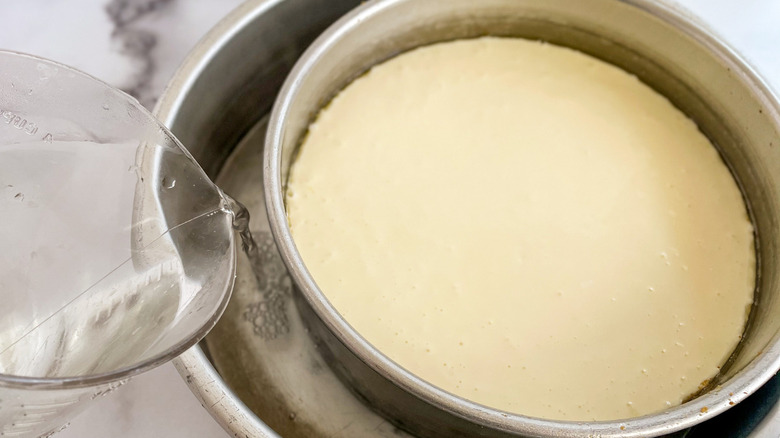
The time has come to bake the cheesecake, but first, we need to prepare a water bath. To do so, heat about a quart of water to steaming. Place the cheesecake in a roasting pan or a larger cake pan, then pour the hot water into the larger pan, making sure it comes up as high as the batter, but doesn't splash into the pan.
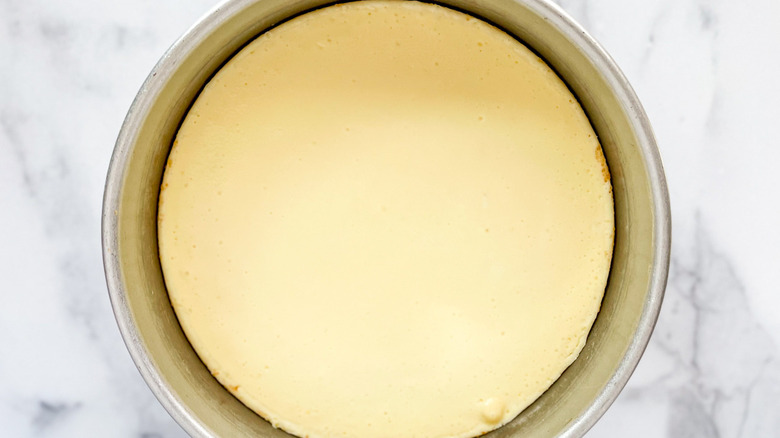
Carefully place the cheesecake in the oven. (Use oven mitts, because the water is hot.) Reduce the heat to 250 F, and bake the cheesecake at a nice, gentle heat for 1 hour and 10 minutes.
At this point, the cheesecake won't look done, but it's time to turn off the oven. Crack it open for just 1 minute, then close the door and leave the cheesecake in the oven to carry-over cook in the oven for an additional hour.
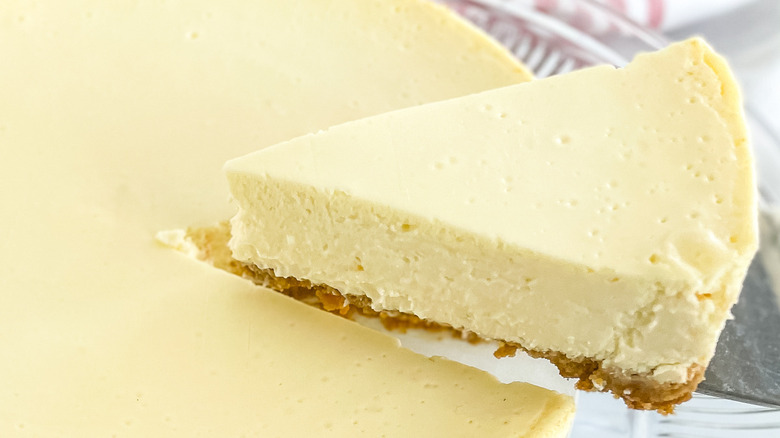
"The cheesecake is done when it no longer looks wet, it jiggles slightly, and has pulled away from the sides a little," says Morey.
Cool the low-calorie cheesecake
After an hour of waiting, it's time to remove the cheesecake from the oven. But, you're not done yet. The cheesecake needs to cool completely before you can dig in.
Remove it from the water bath, and run a thin knife around the edge to separate it from the sides of the pan. This will make it easier to take it out of the pan later. Then, chill the cheesecake for at least 6 hours or overnight. We know it's hard to wait, but it'll be worth it.
Remove the cheesecake from the pan
It's finally time to serve the cheesecake. But since we wanted a crisp crust and thus opted against a spring form pan, this is going to require a little bit of technique.
First, take the cheesecake out of the fridge and run a thin, sharp knife around the edges of the pan once more, making sure to get all the way down to the crust. Then, grab a larger pan (The same one you used for the double boiler will do nicely.) and add a few inches of hot water. Dip the bottom of the cheesecake pan into the water for about 10 seconds — any more, and you'll have a soggy cheesecake bottom.
Flip and serve the cheesecake
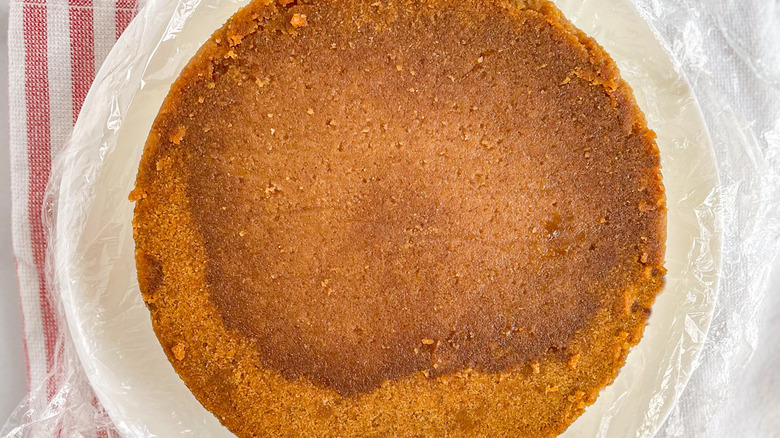
Now, the moment of truth. Cover the surface of a dinner plate in plastic wrap, and place it on top of the cheesecake, plastic side down. Then, flip the cheesecake onto the plate, tapping or shaking the pan to help it release.
Once the cheesecake has emerged, place your serving plate on top of the cake, and then gently flip once more, so that the cheesecake is now right-side up on the serving plate.
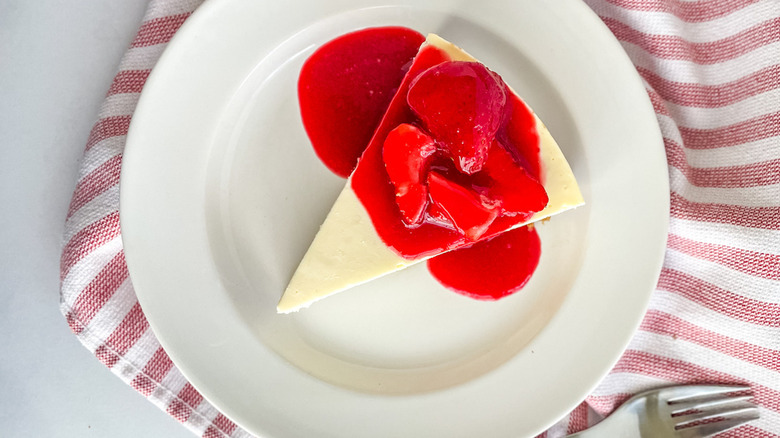
Good job! You've earned a slice of cheesecake. Enjoy it alone or with a simple strawberry topping. Morey makes hers with 2 cups of fresh (or frozen) strawberries cooked down with 2 tablespoons of sugar and 1 tablespoon of fresh lemon juice. The topping adds about 17 more calories per serving.
This Guilt-Free Cheesecake Is Perfect For Dessert Time
The flavor of this guilt-free, low-calorie cheesecake is incredibly refreshing. It's a creamy and decadent treat you'll want to enjoy any day of the week.
Ingredients
- 1 cup low-fat cottage cheese (1% milkfat, small curds)
- 9 sheets low-fat cinnamon graham crackers
- 1 tablespoon brown sugar
- dash of salt
- 2 tablespoons unsalted butter, melted
- 1 tablespoon water
- 8 ounces Neufchatel cheese, room temperature
- 1 1/2 cups low-fat Greek Yogurt (2% plain)
- 2/3 cup granulated sugar
- 1/2 teaspoon vanilla extract
- 1 tablespoon lemon juice
- 1 teaspoon lemon zest
- 2 large eggs, room temperature
Directions
- Spray an 8-inch cake pan with high sides with cooking spray, and line the bottom of the cake pan with a circle of parchment paper. Spray the parchment paper circle with cooking spray, too, and set aside.
- Line a mesh strainer with a paper towel, and place over a bowl. Add the cottage cheese to the strainer, and allow the cheese to drain for 30 minutes while you prepare the crust.
- To make the crust, preheat the oven to 350 F.
- In the bowl of a food processor, add the graham cracker sheets. Process the graham crackers until they are the size of coarse crumbs.
- Add the brown sugar, salt, and butter, and pulse until the graham crackers are finely ground and the ingredients are combined. Add the tablespoon of water, and pulse the mixture until it begins to clump. The mixture should hold together when squeezed in your hand.
- Pour the graham cracker mixture into the prepared cake pan, and press the crumbs to the bottom of the pan until they are even and compact.
- Bake the crust at 350 F for 10 to 12 minutes, until the crust is lightly golden brown around the edge.
- Remove from the oven, and set aside. Clean the food processor, and keep the oven on.
- To finish making the cheesecake filling, scrape the drained cottage cheese into the cleaned food processor, and process until completely smooth.
- Add the Neufchatel cheese and the Greek yogurt, and process until completely smooth.
- Use a rubber spatula to scrape down the sides of the food processor bowl to make sure no lumps get missed.
- Next, add the sugar, vanilla, lemon juice, and lemon zest. Blend together until fully combined.
- Give the sides of the food processor bowl a scrape with a rubber spatula to make sure everything is well mixed. Add more vanilla or lemon zest to taste.
- Turn on the food processor again, and add the eggs one at a time, mixing the first egg in completely before adding the next.
- Once the batter is fully mixed, spray the inside of the cake pan one more time, being careful not to disturb the crust, and pour the cheesecake batter over the crust. Set aside.
- In a saucepan or the microwave, heat about a quart of water until steaming.
- Place the 8-inch cheesecake pan into a slightly larger pan, like a roasting pan or a 10-inch cake pan.
- Make a water bath by pouring the hot water into the larger cake pan, making sure the water comes up just as high as the cheesecake batter in the 8-inch pan. Make sure you don't splash any water into the cheesecake batter.
- Carefully place the cheesecake and water bath into the oven, and close the door. Turn the heat down to 250 F, and bake for 1 hour and 10 minutes. Turn off the oven. The cheesecake won't be done, and that's okay. Open the oven door a crack for 1 minute, then close it again and allow the cheesecake to sit in the oven for 1 more hour. The cheesecake will finish cooking while it sits in the oven.
- After the hour is up, remove the cake from the oven and the water bath, and allow to cool completely. Run a thin knife around the edge of the cake to loosen from the sides of the pan. Chill in the refrigerator for at least 6 hours or overnight.
- To remove the cheesecake from the cake pan, remove the cake from the fridge and run a thin, sharp, knife around the edge between the cake and the pan to loosen. Make sure to get all the way down to the crust.
- Get a pan that's slightly bigger than your cheesecake pan, and add a couple of inches of hot water. Dip the bottom of the cheesecake pan into the hot water, and hold for about 10 seconds. Don't heat for too long, or the crust will get soggy.
- Take a dinner plate lined with plastic wrap, and place on top of the cheesecake pan, plastic side down. Flip the cheesecake over onto the dinner plate, and give a gentle tap or a shake to help release. The cake should slide out on to the dinner plate (upside down).
- Once the cheesecake is out, grab your serving plate, and place it inverted on top of the cake. Gently, as to not smush the cake, flip the cheesecake back over (right side-up) onto the serving plate.
- Serve, and enjoy!
Nutrition
| Calories per Serving | 211 |
| Total Fat | 9.3 g |
| Saturated Fat | 4.8 g |
| Trans Fat | 0.1 g |
| Cholesterol | 54.1 mg |
| Total Carbohydrates | 23.2 g |
| Dietary Fiber | 0.4 g |
| Total Sugars | 17.3 g |
| Sodium | 206.4 mg |
| Protein | 9.1 g |