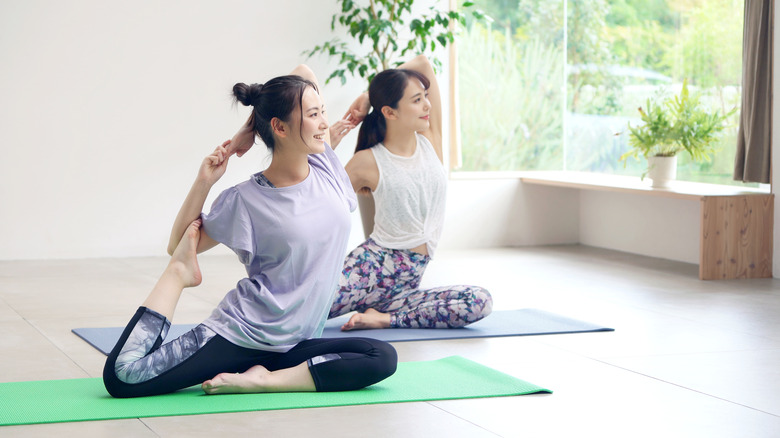
The Best Yoga Poses To Increase Flexibility
We may receive a commission on purchases made from links.
When you think of exercise, your mind may tend to veer in one of two directions: Heart-boosting cardio workouts like running, cycling, or swimming — or muscle-building activities like weightlifting or calisthenics. But one thing you might not think about immediately is flexibility, and you really should. "Flexibility is often overlooked, but the benefits of it are universal and impactful—whether you're a hard-working corporate executive, an athlete, or a weekend warrior, implementing a consistent stretching routine can have a positive impact on your life," states StretchLab director of education Austin Martinez (via Well+Good).
Maintaining proper flexibility not only allows your body to move with ease and efficiency, aiding you in any exercise you're doing, but it also reduces the likelihood of injury and improves your posture.
But let's be real. Stretching can take a while, and it can be a bit, well, dull. So that's why we think the best way to increase your flexibility is to incorporate it with another practice — Yoga is a great place to start. Although most people assume that doing Yoga effectively requires good flexibility already, that's really not the case — even total beginners can see their flexibility drastically improve with regular practice (per Aaptiv). And adding these flexibility-encouraging moves to your repertoire will get you there even faster.
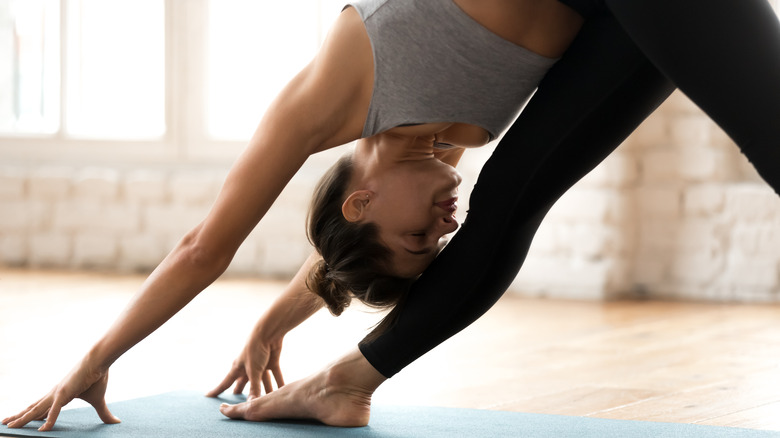
Pigeon pose (Kapotasana)
The very mention of pigeon pose might have you wincing, but trust us when we tell you that when it comes to encouraging flexibility, few moves are better. Pigeon pose provides a deep stretch and increases flexibility through your hip region specifically, opening up the area to provide better movement, explains Healthline. Pigeon pose also promotes better flexibility through your lower back, and may assist in reducing lower back pain.
To do a pigeon pose, you'll first need to move into downward-facing dog. Begin on your hands and knees on your yoga mat, and then push your body up and your hips toward the ceiling, so that your legs and upper body are straight, and your body is in a steeple position. Then, take one of your legs, and move it in toward your chest, then down to the ground. Place the outside of your knee on the mat, and allow your thigh to rest on the ground, with your leg slightly bent so that your lower leg lies on the mat facing into your body. Gradually allow your butt to come down to the mat, with the glute on the side of your bent leg coming in and sitting on the ground, if possible. Using your arms to stabilize your body, feel the stretch through your hips, keeping your gaze forward.
Hold for 5-10 breaths.
Child's pose (Balasana)
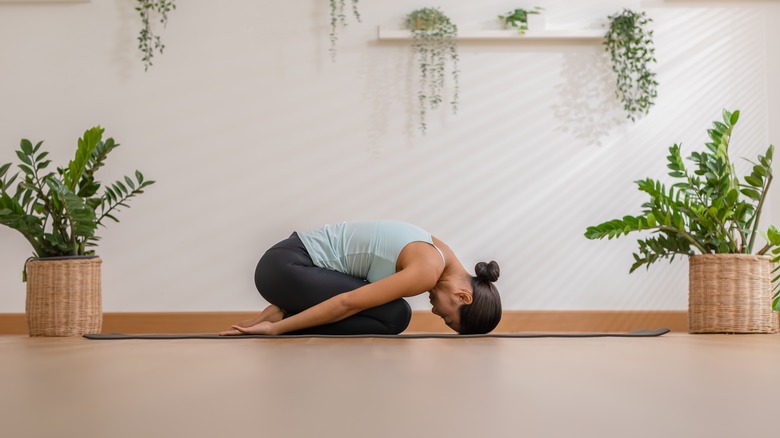
Ah, child's pose. Few combinations of words bring such a sense of peace to our hearts. Yet while most of us know child's pose as the classic resting position in yoga practice, where you catch your breath and settle your minds, it's also great for flexibility. Child's pose is especially good for individuals who experience lower flexibility in their back, and for loosening up tight muscles from lower-body exercise by offering a stretch through your hips and thighs, according to Ekhart Yoga.
While child's pose is a beginner move, it's still important to do it right. On your mat, get onto all fours, with your arms underneath your shoulders and your legs spread a little wider than usual (per Everyday Yoga). Then, allow your butt to move back so that it rests on or between your heels (if your hips are less flexible, you can keep your feet together a little more). Once your buttocks are back, slowly bow your upper body forward, allowing it to rest over your thighs, while your head comes to the mat gently. Keep your arms back by your sides, or place them in front of you to generate a stretch through the back.
Breathe into the stretch, allowing your body to relax, for around a minute or so.
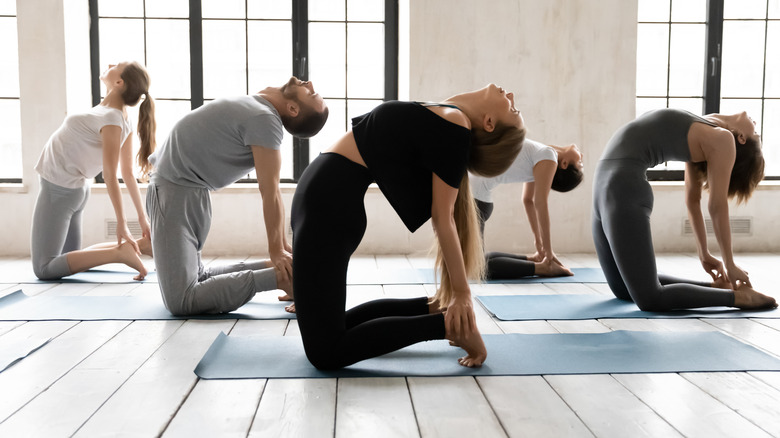
Cat-cow pose (Marjaryasana)
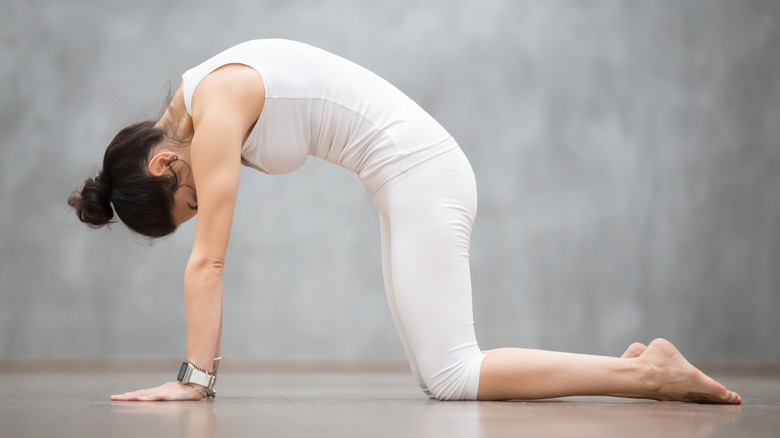
Spinal flexibility is paramount for ensuring that you're able to complete your everyday movements effectively, and a limited range of motion in the spine can quickly lead to knock-on issues (per the Ideal Spine Health Center). And while there are several Yoga moves that encourage better flexibility in the spine, few do so as effectively as the cat-cow pose. Cat-cow allows you to work into your spine, while also stretching out your neck, opening your chest, and generating movement in your abs, explains Everyday Yoga. And it also allows you to pretend that you're everyone's (well, almost everyone's) favorite animal for a bit, which is just fun.
Get onto all fours on your mat, with alignment through your limbs and joints. Keep your neck straight and relaxed, looking down and forward. Then, as you breathe in, allow your stomach to sink toward the mat without moving your limbs. Your chest should open as you do so, with your neck and head coming up. This is the "cow" part of the sequence. Then, while breathing out, bring your stomach back in, and arch your back, allowing your head to drop forward and down (but not pushing your chin to your chest), for the "cat" part.
Continue to alternate between "cow" and "cat," using your breath to guide the movement.
Intense side stretch (Parsvottanasana)
If you've come across the intense side stretch in your Yoga practice, you'll be well aware that it lives up to its name. But this pose, which is slightly more challenging, also offers you a host of benefits for your flexibility, helping to stretch your legs, hips, and spine in one go, according to Greatist. The pose, also known as Parsvottanasana, can also assist in improving your balance and posture.
Stand up straight, with your spine tall, and then step one foot forward. Keep your toes pointing forward on the front foot, and slightly turn your back foot out to the side, while keeping your hips facing the wall in front of you. Place your hands behind your back or on your hips, and then hinge your upper body forward, keeping both your spine and your legs straight if possible. As you fold over your front leg, you can allow your hands to come to the floor.
Keep breathing, and hold the stretch at the bottom for up to a minute, before slowly returning to standing and repeating with the other foot in front.
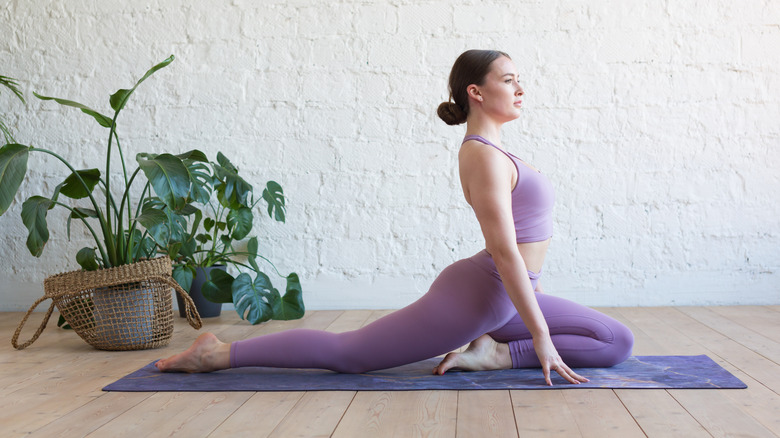
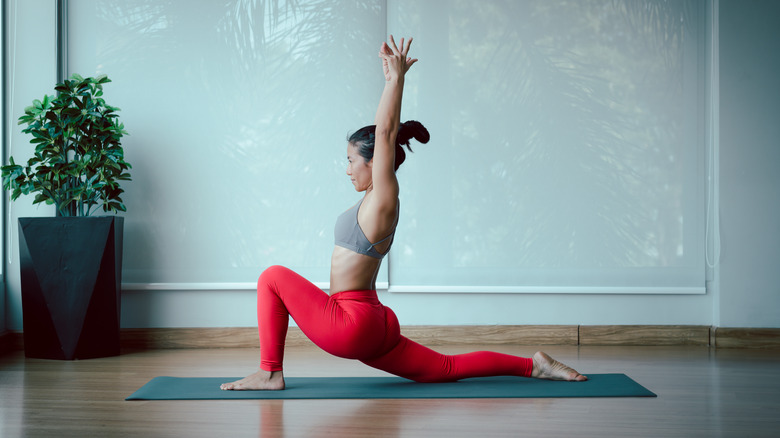
Warrior 1 (Virabhadrasana 1)
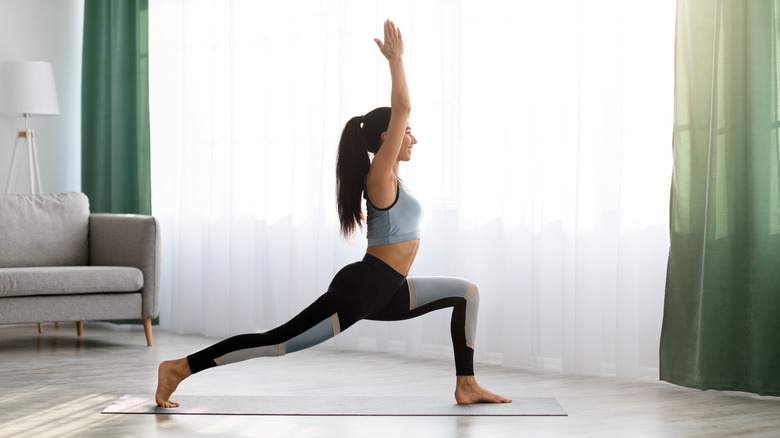
There's a strong likelihood that you've come across Warrior 1 if you've done Yoga before, as it's a staple of a lot of flows. But that doesn't mean that it's a walk in the park. Warrior 1 is a robust pose that not only encourages flexibility in your lower or upper body but also develops strength through the larger muscles in your legs and your back, according to Yoga Journal. And you'll feel like an absolute boss doing it, too.
From a downward-facing dog pose, take a big step forward and plant one of your feet between your hands, so that you're in a lunge, with your hands still planted on the floor. Shift your back foot so that it's pointing outward a little, and straighten out your back leg. Breathe in, and then lift your upper body so that it's upright, with your hands raising to the sky as you do so.
Your hands should be facing inward, with your chest open. You can also place your hands together above your head if you wish. While this may seem like a simple move, the key thing to remember here is to stay aligned: Ensure that your hips and upper body are facing forward, your legs are strong, that you're generating a stretch through your torso, and that your hips don't sag. Hold the position for up to 10 breaths.
Standing forward bend (Uttanasana)
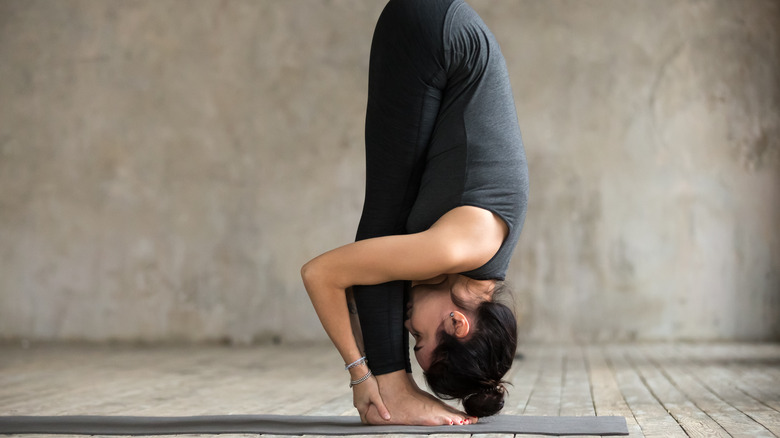
In Yoga, it pays to keep things simple. And the standing forward bend is about as simple as it gets. A move familiar to anyone who's ever tried to touch their toes before, the standing forward bend (or Uttanasana) is not only a good indicator of how flexible you are in the first place, but also encourages more flexibility through the back of your legs, lower back, and hips, explains Yoga Journal.
However, just because you may have done the standing forward bend before, doesn't mean it's not worth reminding yourself how to do it right. Begin in a standing position, with your feet facing forward, your legs straight (but not locked), and your fingers resting lightly on your hips. Gently hinge forward from your hips, and bring your upper body down to meet the tops of your thighs, keeping your torso long and straight. Release your hands, and let them drop toward the floor. Avoid letting your lower body collapse in this position, keeping your legs as long as you can, and your heels driving into the ground. Let your head hang heavy.
Hold the position for up to 30 seconds, and then return to standing, keeping your spine long as you do so.
Plow pose (Halasana)
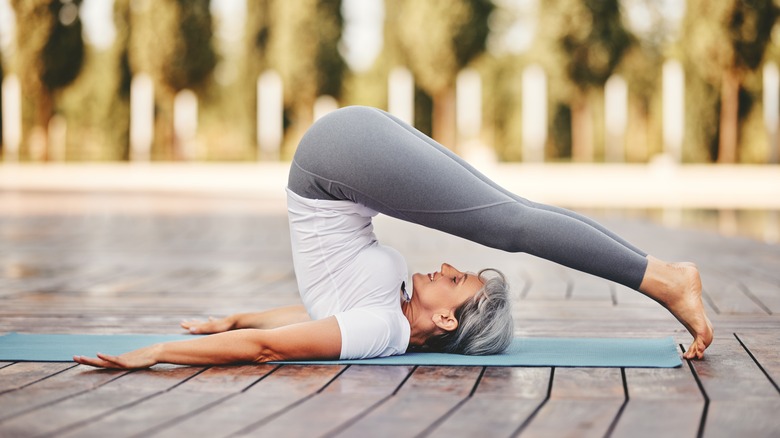
Halasana, or plow pose, may remind you of when you used to roll onto your back when you were a kid, kicking your feet over your head. But this move isn't just good for nostalgia — it's also incredible for your flexibility. Plow pose encourages increased flexibility through your back and spine, and can also ease tension through your neck and shoulders, according to Healthline. And as a move that raises your heart above your head, plow pose also provides specific and unique benefits to circulation, and could also make digesting your food that much easier.
Begin Halasana by lying on your back on a mat, with your arms by either side, and palms facing down to stabilize you during the move. Breathe in, and lift your legs off the mat, until they're pointing toward the sky. Then, as you breathe out, bring your hips up and your legs over your head, moving them back until, if possible, your toes are touching the floor behind the crown of your head. Keep your hands by your sides, or place them on your lower back to increase stability of the move.
Try and hold the pose for a maximum of two minutes, before your release and slowly roll out until you're lying down again.
Cow face pose (Gomukhasana)
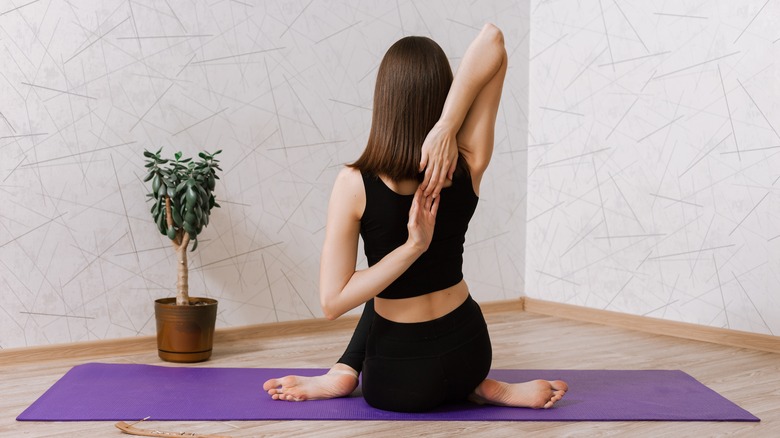
The cow face pose, or Gomukhasana, has more going for it than just a pretty cool name. This Yoga move is also great for developing flexibility in your upper body. While many Yoga poses focus on lunging or planking positions, cow face pose explicitly generates flexibility through your chest and shoulders, with your arms also benefitting, as Healthline discusses.
Stand up tall, or sit in a chair or on the floor with your back straight and your gaze forward. Keep your chest open and your shoulders back and down. Then, take one arm, and sweep it up above your head, before bending your upper arm back behind your head and down your spine. Take your other hand, and gently place it on the bent elbow, encouraging your arm to move a little further down to introduce a deeper stretch.
You can also take your arm and move it up your back, gripping your hands together. Breathe deeply, and hold the pose for around 30 seconds or so, before doing the same on the other side. Keen readers might figure out that this pose is similar to an overhead tricep stretch, but honestly, with a name like "cow face pose," why would you refer to it any other way?
Wide-angle seated forward bend (Upavistha Konasana)
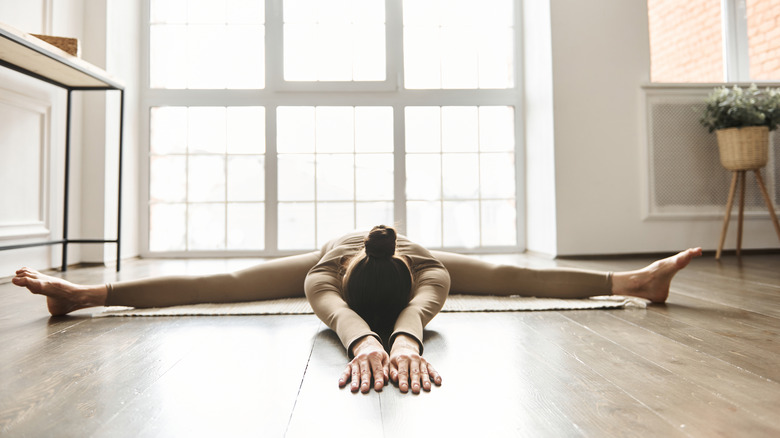
Hip-opening exercises are a constant in Yoga practice, and the wide-angle seated forward bend is one of the most common. While challenging, this pose can promote flexibility throughout your hips and back, and gives your thigh muscles a robust stretch (per Ekhart Yoga).
Begin by sitting in staff pose, or Dandasana, with your feet extended straight in front of you, your upper body upright and your spine elongated, with your hands planted by your side to stabilize you. Then, separate your legs and move them to each side, until you're sitting in as wide a split as you can without your posture being compromised. Hinge your upper body forward from the hips, and walk your hands forward, one by one, to generate a further stretch through your legs and pelvis.
Once you're at the furthest point you can go, hold the pose for up to 10 deep breaths. If keeping your legs straight is a problem, don't be afraid to introduce a slight bend into them. And don't be discouraged if you can't maneuver into a perfect split the first time around — remember, better flexibility takes time, so just do what you can.
Triangle pose (Trikonasana)
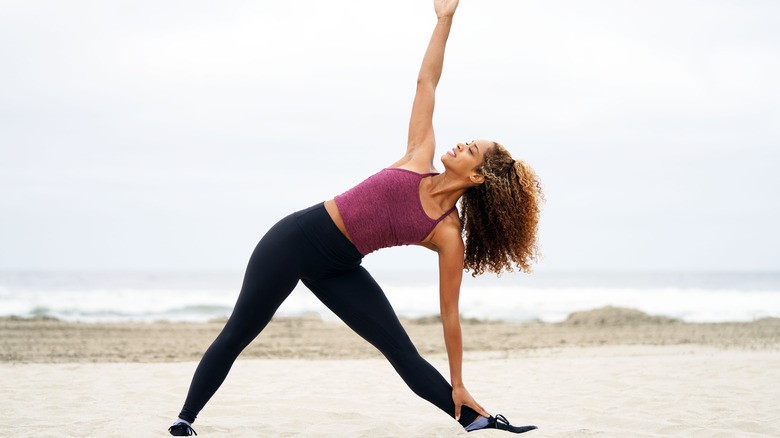
If you've taken a couple of Yoga classes in your time (or, if you're anything like us, followed along to them on YouTube), you'll likely have come across the triangle pose. And while it can look daunting, mastering the pose can do wonders for your flexibility. Triangle pose is especially useful for developing flexibility in your back and through your spine, and also works as a hip-opener, according to Masterclass. Your shoulders will get a good stretch, too, and triangle pose also helps to strengthen your abs and improve balance.
Begin by standing up straight, and shift your feet so they're a little wider than normal. Stretch your arms out to either side, palms toward the floor, and turn one of your feet so that it's pointing forward. Then, on an out breath, bend your body sideways over your out-turned foot (your torso should be facing toward your pelvis, not bent over your leg). As you bend, bring your hand down, and hold your lower leg, while your other hand reaches up to the sky — gaze toward your reaching hand. If you wish, you can place your lower hand on the floor.
Breathe deeply into your stomach, holding the pose for 10 breaths as you look toward the ceiling, and then slowly come back up to standing.
Bow pose (Dhanurasana)
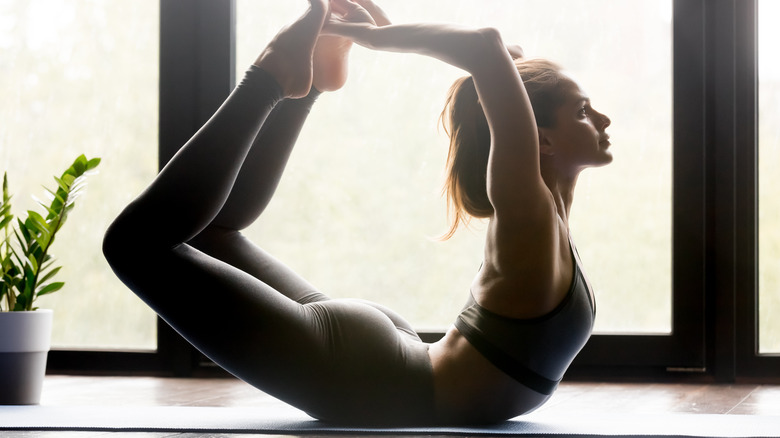
In Yoga, some moves can seem harder than others — and the bow pose might look the hardest of them all. But we seriously recommend incorporating it into your repertoire, as when it comes to moves that increase flexibility, it really is second to none. Bow pose heightens flexibility throughout your entire system, with the total-body stretch working through your back and chest, through your core, and down to your legs, according to Yoga Journal.
You'll begin this pose — in news that will probably be music to your ears — by lying flat on your belly. Place your hands down alongside you, with your palms facing the ceiling. Bend your lower legs, so that your feet come toward your butt, and as you breathe out, grab your ankles with your hands. And then the tricky bit: Breathe in, and lift your lower body, using your hands to help you, while simultaneously lifting your chest off the mat too. Your body should move into a bow shape. Keep your shoulders back and your neck long — and whatever you do, don't hold your breath. It'll be tempting, but keep the breath moving through your body, focusing it into your back.
Hold bow pose for up to 30 seconds, and then gently release, resting on your mat.
Camel pose (Ustrasana)
How much time do you spend hunched over a computer? Probably a fair bit, right? And when you do that day in, day out, over time your posture and flexibility can suffer, with your chest and abdomen losing their openness. Camel pose is a great way to combat this. This pose provides a significant stretch through the front of the upper body, as well as your quads, increasing flexibility and introducing movement into your spine to boot (per Greatist).
Start by kneeling on your mat, with your upper legs raised and your spine long, and your hands placed gently on your hips. Activate your thigh muscles and as you breathe in, allow your chest to open and your body to bend backward. Continue to breathe, and move your hands so that they're holding onto your heels, as your chest and back curve back, so that your chest and shoulders are facing the ceiling. Hold the pose there for several breaths, making sure you're not crunching your neck back. As this move works through the spine, ensure that you're moving slowly throughout, and if you have trouble, try placing a block between your lower legs to rest your hands upon.
Low lunge (Anjaneyasana)
The low lunge is the bread and butter of Yoga poses. Present in pretty much every Yoga flow there is, it's a fundamental pose that develops flexibility through your entire body, with your hips and spine being particular beneficiaries of the move (per Healthline). The stretch that the low lunge provides could also be useful for individuals who have sciatica, thanks to the relief it could give to your sciatic nerve, pressure on which is a cause of the condition, according to the Mayo Clinic.
Kneel on your mat, and then take one of your legs and plant your foot in front of your body. Your knee should be at a 90-degree angle. Avoid allowing your body to bend or crunch over your knee, and shift your weight forward slightly so that you feel a stretch through your hip. As you do so, raise your arms to the sky, feeling the stretch through your front body. Don't lean your hips forward too much, as you don't want your knee to extend over your foot. Hold the low lunge for up to 30 seconds, and then repeat on the other side.
Head to knee (Janu Sirsasana)
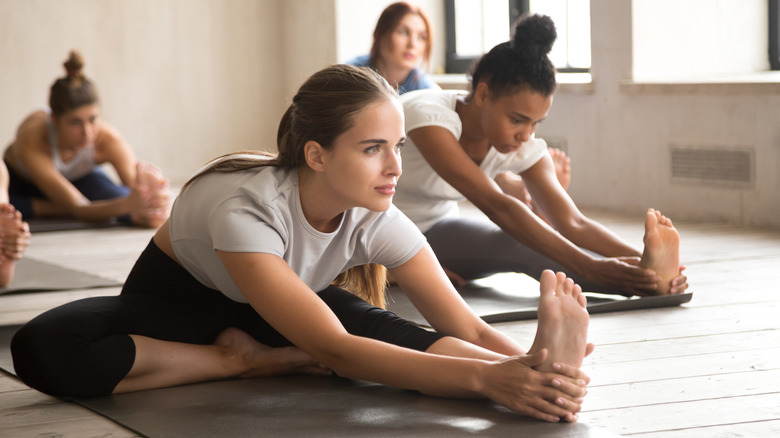
To develop better flexibility throughout your body, it might seem like bending one muscle at a time is the best way to go, but if you want to see true improvements, full-body poses are where it's at. Head to knee is one of the best for this. In one pose, head to knee will stretch the muscles along the back of your torso and legs, and also encourage length through your spine (per Yoga Journal). The bent leg, tucked into your hips, gives you further stability and takes some of the pressure off your glutes.
Begin in a seated position, with your legs in front of you, flat on the floor. Take one of your legs, and bend the knee, tucking your foot into your groin, so that the outside of your leg lies flat on the ground. Breathe in, and lift your arms above your head, keeping your upper body long and strong. Then, on an exhale, bring your hands down and over your extended leg as far as possible, reaching to your foot. The intention here is not to go as far as you can, but rather to keep your spine long.
Once your hands are at their maximum reach, gently bend your body over your extended leg. Hold the pose, breathing deeply, for up to two minutes, before carefully unfolding and repeating it on the other side.