Yoga Poses To Relieve Lower Back Pain
Yoga is for everybody — not just the thin white girls on Instagram doing handstands. Yoga is a series of movements, or poses, that incorporates focusing on the breath. It can help stretch and strengthen your muscles, which in turn can reduce muscle tension and improve mobility, strength, and balance. In fact, yoga is one of the most common and effective methods for addressing lower back pain (via Harvard Health Publishing).
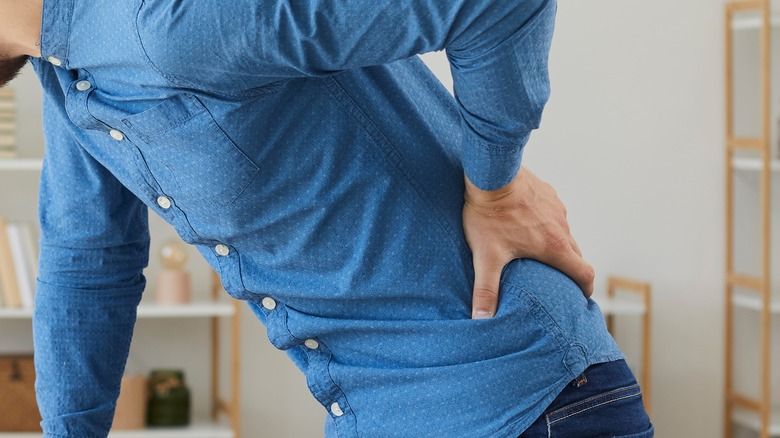
Low back pain is so common that on average, four out of every five people have experienced it (via the Cleveland Clinic). Those over the age of 30 tend to have more back pain, as your spinal disks wear down over time. Obesity, scoliosis, a family history of osteoarthritis, smoking, alcohol abuse, and a sedentary lifestyle all increase your chances of experiencing back pain, too. Sitting at a desk all day or simply being inactive can result in weak abdominal muscles that struggle to support your spine, leaving you susceptible to a back injury. Jobs that require physical labor and heavy lifting can also increase your chances of straining your back. Even depression and anxiety can lead to back issues.
The benefits of yoga

Yoga can be beneficial for back pain because it can help strengthen the muscles around the spine, which can stabilize and support your back. In fact, one study (via Annals of Internal Medicine) found that yoga was just as effective as physical therapy for easing lower back pain. The slow, gentle movement and deep breathing can also help regulate your nervous system, decreasing the anxiety and tension you feel around the pain. The key to utilizing yoga for back pain is to remember to move slowly and intentionally — sudden or fast movements can cause more pain or injury. Yoga is all about practicing mindfulness.
When practicing yoga for back pain, take it slow and don't push it. Steer clear of twisting and lengthening at the same time, according to Harvard Health Publishing. If something feels uncomfortable or painful, gently come out of that pose and don't do it. Everyone is different, and some poses will work better for you then others. Don't be afraid to make modifications and ask your yoga instructor for help. You can also use props like yoga blocks, blankets, and bolsters to help you modify poses. It's always a good idea to ask your doctor if yoga is right for you, since yoga should be avoided for certain back issues, like a herniated disc.
Cat/cow
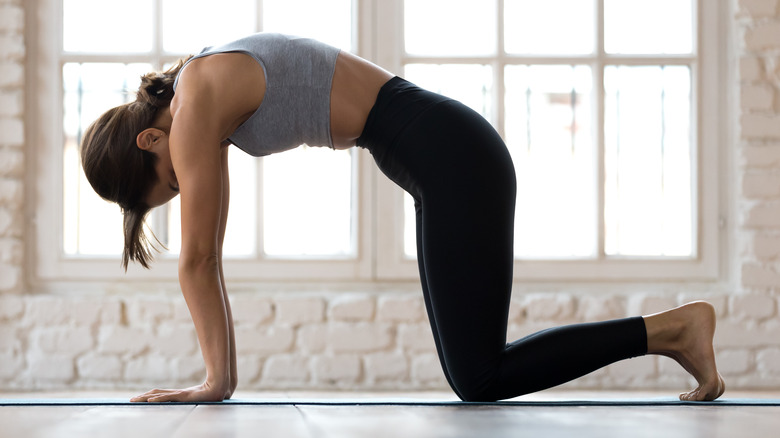
Cat and cow pose is a common flow seen in many yoga classes. It involves moving through two different poses called cat and cow. It is a gentle backbend that stretches the spine, neck, shoulders, and torso, which can all help to stabilize the back.
Start in table top position, on your hands and knees (via Healthline). Make sure your wrists are underneath your shoulders, your hips are under your knees, and your body weight is evenly balanced. As you inhale, look up and move your stomach towards the ground — this is cow pose. Then as you exhale, look down, tuck your chin into your chest, and arch your spine up towards the sky — this is cat. Make sure to pull your belly button in towards your spine. Continue moving with your breath, going into cow pose as you inhale and cat pose as you exhale, for about one minute. Focus on your breath and relaxing your muscles.
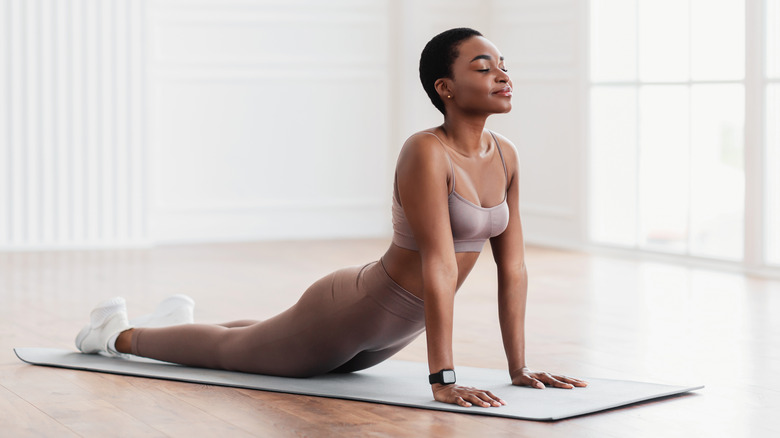
Downward facing dog
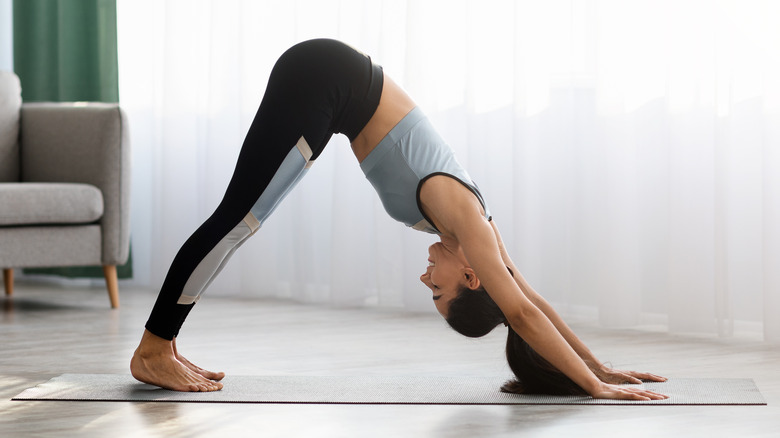
Downward facing dog is another common pose in yoga, but it can be a challenging one. This pose stretches the entire back, and can help relieve back pain, stiffness, and tension (via Healthline). Begin in table top position, on your hands and knees. Make sure your wrists are underneath your shoulders and your hips are under your knees. Press into your palms, tuck your toes, lift your knees, and press your hips up towards the sky. Subtly push your chest towards your thighs, while tucking in your stomach and keeping your hips pressing upwards. Try to relax your shoulders and lengthen your spine. If you feel uncomfortable or it seems like the distance between your hands and feet is too short, step your feet back a little further and notice how that feels (via TODAY).
This pose can feel intense for beginners and tight yogis alike — it's okay to try it first with some modifications, like keeping your knees bent and heels off the floor. The most important part of this posture is to focus on extending your spine and taking deep breaths.
Sphinx
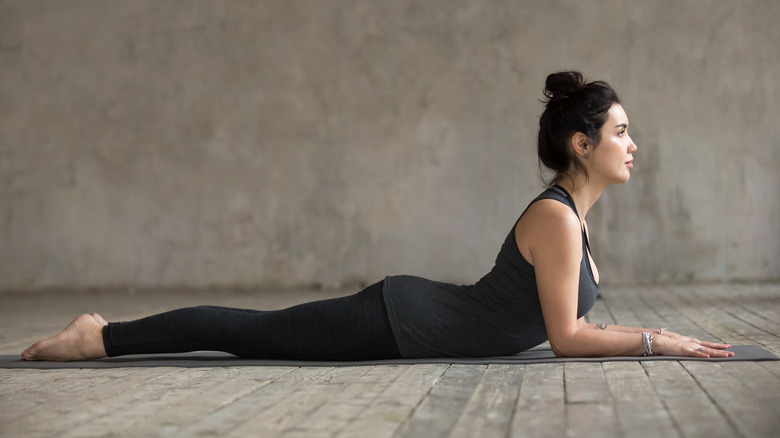
Sphinx pose is a gentle spine extension that can help strengthen your back muscles and be a nice counterpose after sitting down all day. It also stretches your core.
Begin by laying on your stomach, with your arms bents so your elbows are in line with your shoulders and your palms face down on the mat (via Insider). As you inhale, press your hands and forearms down into the ground to lift your torso up, but keep your hips and legs on the mat. Slide your forearms forward so that your elbows are underneath your shoulders. Engage the muscles in your legs so your hips, knees, and feet stay on the ground (via Spine Health). Press your elbows into the floor and keep pressing your chest forward. You should feel a comfortable stretch in your back. Hold the pose for several breaths, up to 30 seconds, then slowly lower your upper body back down to the ground.
Cobra
This pose is similar to sphinx, but slightly different. It is a moderate backbend that helps strengthen the muscles in your back and spine. It is believed to help with sciatica pain, as well as low back issues (via Healthline).
Start laying down on your stomach with your palms face down underneath your shoulders. Tuck your elbows in by your sides. Gently press into your hands and engage your back muscles to slowly move your head, shoulders, and chest off the ground. You can stay here, lightly pressing the palms into the ground, to strengthen your back muscles. Or you can press more into the hands, lifting up higher, halfway or all the way up. If you feel any pain, don't come up as high and focus on lengthening the back of your neck and strengthening the muscles in your upper back. Keep your glutes relaxed, and don't forget to breathe! Child's pose and downward dog are good counterposes to follow cobra pose (via Yoga Journal).
Child's pose
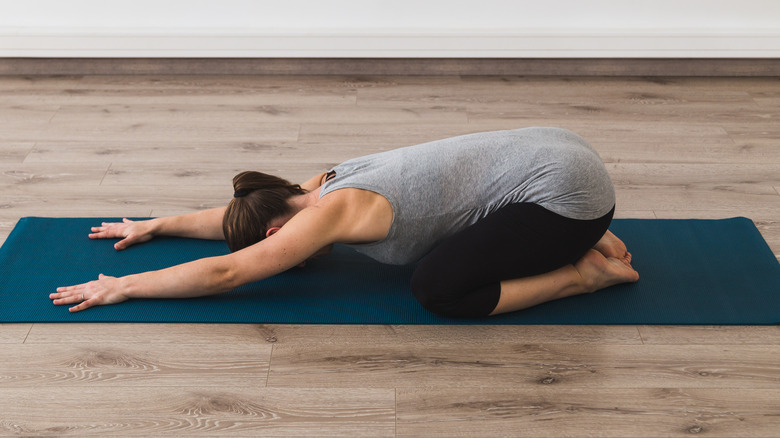
Child's pose is a classic yoga posture that can be calming and relaxing, while releasing pressure in the low back by stretching the back and hips (via Yoga Journal).
Start by kneeling on your mat. Make sure your big toes are touching, then sit on your heels. Slowly move your knees to the outer edges of your mat, about as wide as your hips, or wider if you like. As you exhale, gently lower your upper body in between your legs. Lengthen your arms, reaching away from your body and resting them on the ground, palms face down and fingers spread wide. Try to lengthen and extend your spine and the back of your neck.
You can rest your forehead on the mat or a block. Also, you can use a blanket underneath your feet for extra ankle support, or place one in between your thighs and calves if your hips feel extra tight and it's hard to sit on your heels (via Insider).
Pigeon pose
This pose works two ways — by opening your hips and releasing your back. It's great for people who sit for long periods of time, since it can help stretch your hip flexors and relieve low back pain (via Healthline). But you shouldn't jump into pigeon pose right away; it's best to do a warmup beforehand, like practicing cat/cow, downward dog, child's pose, or sphinx pose.
Start in downward facing dog. Slowly bring your right knee to touch your right wrist and rest your leg on the ground, with your knee bent. Try to bring your shin parallel to the front of your mat — if it doesn't get all the way there, that's okay. Keep your left leg straight. Adjust so that your right knee rests a little further out to the right then your hip. Keep your weight equally distributed between both hips. You can stay here, or slowly lower your upper body down towards the ground, hovering over your right leg. If this feels too intense for your right hip, you can place a yoga blanket or bolster underneath it. Try to remain in the pose for five to ten slow, deep breaths. Then, return to downward dog and repeat the posture on your left side.
Standing forward fold

This pose may seem simple, but it can be profound. It involves stretching many leg muscles, including your hamstrings, calves, and hips, ultimately releasing tension in the low back (via Yoga Journal). Start standing straight. Place your hands on your hips and bend your knees a bit. As you exhale, begin to slowly bend at your hips, not in your waist or low back. Fold forward as deep as you can comfortably, without pushing or forcing it.
This pose isn't about touching your toes, which is a common misunderstanding. Focus on relaxing and inviting gravity to help lengthen your spine. If your hands don't naturally touch the ground — which is common — hold onto opposite elbows with your hands. Eventually, you may want to work toward straightening the knees, but if you have back issues, keeping bent knees can help protect the low back. Think about centering your body and stacking your ankles, knees, and hips in one line. Remain in this pose as long as you feel comfortable, maintaining a deep breath.
Low squat or garland pose
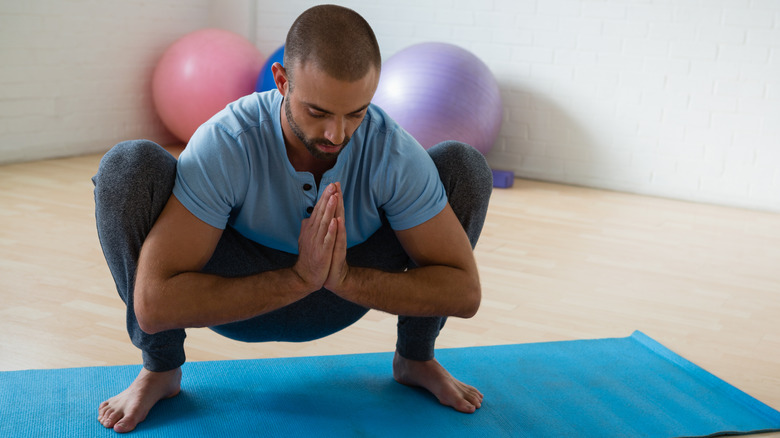
This low squat, also known as garland pose, is an intense stretch for your entire low back, including your quadriceps, groin, hips, and torso (via Yoga Journal). To practice it, begin standing straight on your mat, with your feet a little bit wider then hip-width distance apart. Point your toes out slightly and your heels in. Slowly and gently lower into your squat, bringing your sit bones as close to the ground as you can.
Try to keep your heels on the ground, but if you can't, no worries — place a yoga blanket or a rolled up towel underneath them. Bring your hands together to touch in a "prayer hands" shape, while pressing your elbows into the insides of your knee creases. Focus on lengthening your spine and extending the top of your head towards the sky. Try to hold the pose for about 30-60 seconds, maintaining a deep, steady breath.
Bridge pose
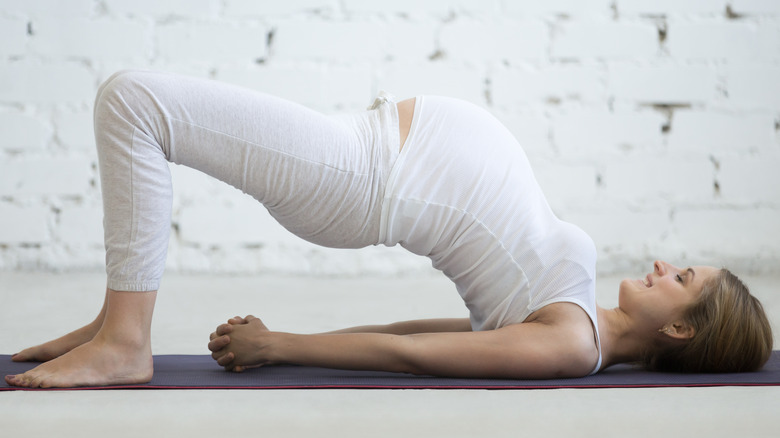
Bridge is another pose that helps to counteract long days of sitting. This pose is all about strengthening your glute muscles. Powerful glutes are necessary for back health, because if the glute muscles are weak, your body tends to use your low back muscles to compensate — which can cause back strain and pain (via Insider).
To practice, begin laying on your back on your yoga mat (via Yoga Journal). Bend your knees and place your feet flat on the floor, hip width distance apart. With your arms by your sides, you should be able to barely touch your heels with your finger tips. Press your feet into the ground as you squeeze your glutes, lifting your hips up toward the sky.
To engage your legs and glutes, you can place a block in between your knees — or just simply imagine a block being there and you trying not to drop it. You can keep your arms as they are, or clasp your hands underneath your body, pressing your arms and hands along the floor. To release, unclasp your hands and slowly lower to the ground as you exhale.
Knees-to-chest pose
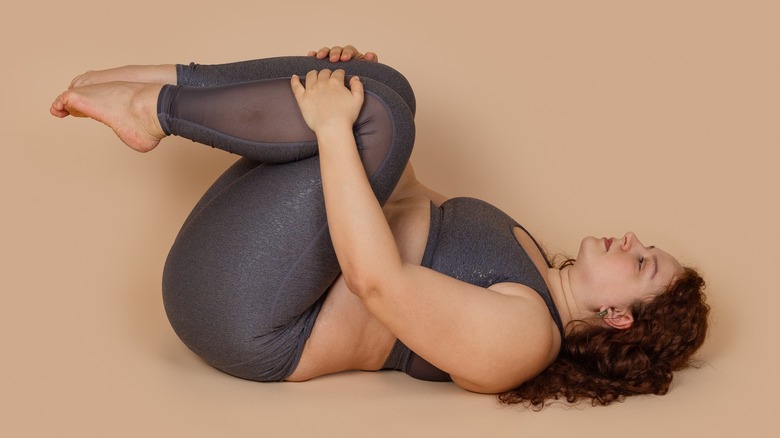
This posture is a nice release for the low back, and can be a good counterpose after a more strengthening posture like bridge. It helps to stretch and relax your low back muscles and looks just as it sounds — it involves bringing your knees to your chest (via Yoga Journal).
To begin, lay down on your back on your mat. Bend your knees and bring them as close to your chest as you can, using your hands to help by holding on to your knees or shins. You can also hug your knees into your chest, pulling your legs into your body, if it feels good. You might want to try swaying your body side-to-side to gently massage your low back along the mat. Stay in this position as long as you feel comfortable, continuing your deep breathing exercises. To release, gently let go of your legs and slowly lower them back down to the ground.
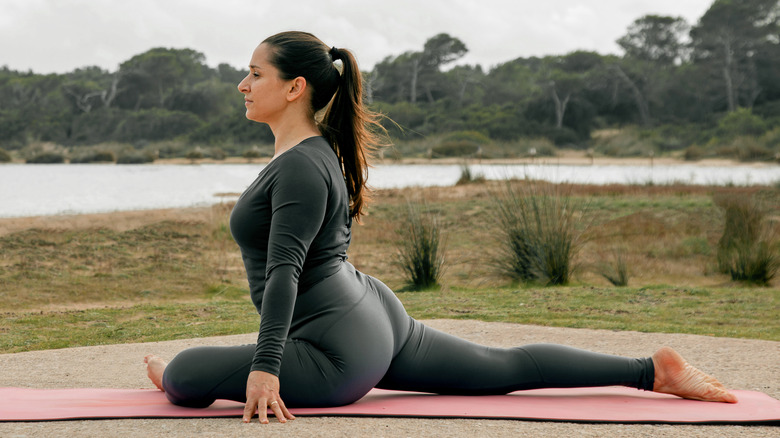
Low lunge
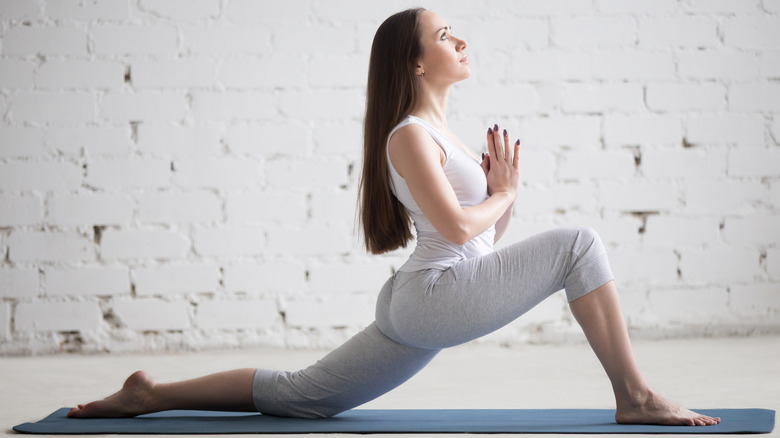
This pose helps to stretch your psoas muscle, which is hidden deep in your low back and pelvis region, and can be a common source of low back pain (via Insider).
To practice a low lunge, you can start from downward facing dog position. Keeping your hands on the ground underneath your shoulders, place your right foot on the ground in between your hands, then lower your left knee and shin to touch the ground, untucking your left toes. You can stay here, or press into your right foot and raise your arms up towards the sky as you inhale. Engage your core muscles and maintain a steady breath.
Alternatively, you can start from a standing position at the front of your mat. While continuing to face forward, keep your right foot on the ground and step your left foot to the back of the mat, then slowly lower your left knee and shin to the ground, using your hands on the mat to help you balance. Stay in the pose as long as you wish, then return to your starting position, and repeat the posture on the other side.
Head-to-knee pose
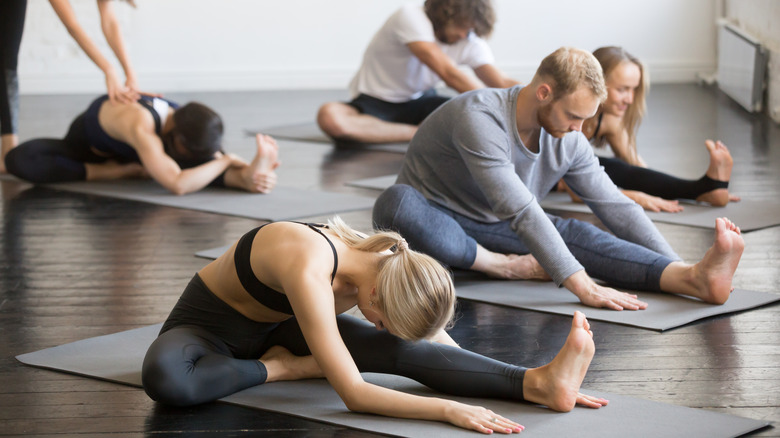
This pose stretches your hamstrings, as well as your quadratus lumborum muscle, which is the deepest back muscle that extends into your hip — all of which can cause low back pain when weak or stiff (via Insider).
This posture makes a figure 4 shape with your legs. Begin seated on your mat, with your legs straight. Bend your right knee and place your right foot on the inside of your left thigh, forming the figure 4 shape. Relax your knees, and as you exhale, slowly lower your upper body over your straight leg. Rest your hands anywhere on your leg or mat that feels comfortable. If this pose feels intense for your hips, you can sit on a yoga block or blanket. You don't have to touch your head to your knee, so don't try to force it — you're just gently allowing gravity to pull the head towards the knee. To release, come up as you inhale, then repeat the pose on the other side.
Supine spinal twist
This pose is a lovely yoga posture to end your practice with, right before settling in to savasana. This pose can help stretch and extend your back and glutes — but sometimes twists can aggravate back issues, so listen to your body on this one (via Yoga Journal). If you feel any discomfort, don't do it.
To practice the supine spinal twist, start by laying flat on your back. Bring your arms away from your sides so that your body makes a T shape. Bend your knees with your feet on the ground, and as you inhale, bring your knees up so that they are in line with your hips, making a right angle with your legs. As you exhale, gently bring your knees to the right, keeping the right angle shape as best as you can. Try to rest your legs on the ground as you keep both shoulders on the mat. Your left hip will naturally lift up as you relax into the pose. Stay in the posture as long as feels comfortable, up to 1-2 minutes. Remember to breath deeply and repeat on the other side.
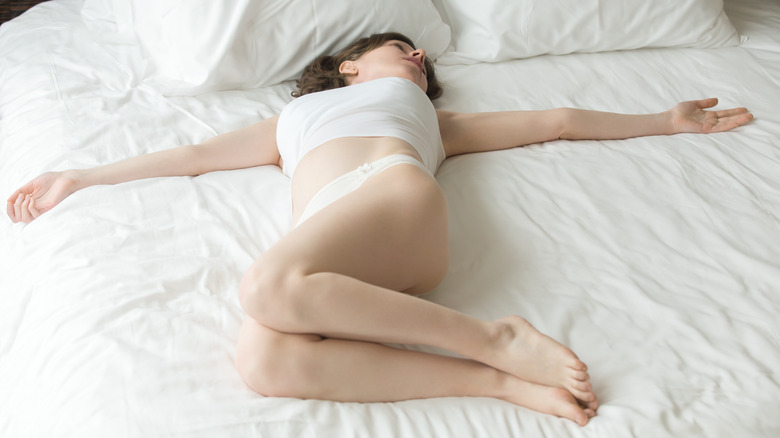
Don't forget to settle in to savasana, or corpse pose, at the end of your practice. This final posture helps to calm and relax your body and mind, promoting stress relief — which can be helpful for dealing with back pain, or life in general (via Yoga Journal).